Showing posts with label Side. Show all posts

Saturday, August 17, 2013

Boston Baked Beans Brennan

Cookbook Recipe #61

I got this cookbook while Phil and I were on a trip to Vegas. We decided to take a day trip to go see the Grand Canyon as neither of us had ever been there. We took a tour bus there as we did not have a car on the trip and on the way they stopped at a restaurant and gift shop for a lunch. In the gift shop they had this cookbook. I always like to try to find a cookbook while I am on vacation as I like to bring home some of the local flavors. I thought this book was perfect for the west. It is chalk full of home cooked cowboy favorites and stories of the wild west.

My Dad and brother Daniel were visiting last weekend and I decided to make a ham and wanted a fun side to go with it. I knew we did not have plans for Sunday so I thought I would finally be able to make from scratch baked beans. They take a long time in the oven so it is hard to do unless you are home all day. They were super easy to make and came out great. I made some additions to the recipe as I like my beans sweet. I added some ketchup and brown sugar. I would probably add even more next time as I would have liked them a little sweeter. Sorry for the picture, I completely forgot to take the picture while they were still in the pot so I had to take leftovers to take this pic.

Boston Baked Beans Brennan
Adapted from The All American Cowboy Cookbook

1 pound dry Great Northern Beans, soaked overnight
1/2 teaspoon baking soda
4 slices bacon, cut into small pieces
1/3 cup molasses
1 teaspoon mustard
1 teaspoon garlic powder
1 teaspoon onion powder
1 1/2 teaspoons salt
1/4 teaspoon pepper
3 tablespoons brown sugar
1/2 cup ketchup

Preheat oven to 300 degrees.

Cook beans in water with baking soda for 10 minutes over medium low heat. Drain and rinse.

In a large dutch oven mix beans, bacon, molasses, mustard, garlic powder, salt and pepper.

Add enough water to barely cover the beans. Bake for 6 hours.

Checking every hour or 2 and adding more water if necessary.

With one hour remaining add the brown sugar and ketchup. Mix well and finish baking.


Wednesday, June 19, 2013

Two Color Rosemary Roasted Potatoes

Cookbook Recipe #54

Yet another recipe from Southern Living. Have I told you how much I love these cookbooks? I was not having luck finding a main dish I wanted to make this week for my cookbook recipe so I decided to go for a side dish. I had a bunch of potatoes in the pantry so I started looking for a potato dish. Phil and I both really like oven roasted potatoes so when I came across this recipe for Two-Color Rosemary Roasted Potatoes, I thought it sounded pretty good. They were really good. I just really like how you get almost a little char on them. Gives them so much flavor. We both enjoyed the combo of the sweet potatoes and baby red potatoes. It was a great side dish to go with our pork chops.

Two Color Rosemary Roasted Potatoes
Adapted From Southern Living Annual Recipes 2005


2 large sweet potatoes, diced
1 pound baby red potatoes, diced
2 tablespoons olive oil
1 tablespoon dried rosemary
Salt
Pepper

Preheat oven to 450 degrees.

Place potatoes on a sheet pan.

Drizzle with olive oil. Season with rosemary, salt and pepper.

Bake for 35-45 minutes.


Sunday, May 5, 2013

Cinco de Mayo

Happy Cinco de Mayo! So this is going to be a long post...... We made so many new things today and I couldn't decide what I wanted to post. So I am going to post all of the recipes. I new I wanted to make something fun and different for today. I saw a recipe for Grilled Baja Style Lobster Tails on Cooking Light's website and thought it sounded really good. I just realized I liked lobster a couple months ago when Phil and I went to the Melting Pot for dinner. I got an entree that had an assortment of meats and lobster. Phil got the same thing I did so I figured I would trade the lobster for more steak. But I tried it and I loved it! Phil was saying that we should try to grill it at home sometime. I saw this recipe and thought we could give it a try. It came out awesome!. The only lobster tails we could find were pretty small so next time we will have to do our research to find a larger tail. But we had so much other food it did not matter. I have been seeing Mexican Street Corn on the Cacique commercials that have been playing over and over recently. So I found a recipe to make the street corn as well. Corn is not really in season yet so I cannot wait to try this one again when the corn is really good. And you can't have a Mexican fiesta without salsa and Margaritas! We made those homemade too! Hope you enjoy the recipes!

Mango Margaritas
Recipe adapted from Ree Drummond

1 tablespoon sugar
1 20 ounce jar mango chunks, drained
1/2 cup tequila
1/2 cup triple sec
Tall cup of ice

Mix all ingredients into a blender and mix well.

Print Recipe


Roasted Tomato Salsa
Recipe adapted from Martha Stewart

9 plum tomatoes, cut in half lengthwise
1 large white onion, quartered
2 jalapenos
2 tablespoons minced garlic
1 tablespoon lime juice
Salt


Preheat grill to medium high heat.


Place onions, tomatoes and jalapeno on grill and grill over direct heat for 8-10 minutes and then flip over and grill another 8-10 minutes or until charred.

Let cool completely.

Blend vegetables, garlic, lime juice and salt in a blender.

Refrigerate until ready to serve (salsa gets better the longer it sits in the fridge).

Print Recipe

Grilled Baja Style Lobster Tails
Adapted from Cooking Light and Bobby Flay


Up to 6 lobster tails
1 tablespoon grated orange rind
2 tablespoons fresh orange juice
1 tablespoon fresh lime juice
1 tablespoon olive oil
1/2 teaspoon dried oregano
1/4 teaspoon salt
Dash of hot sauce
1 teaspoon minced garlic
2 tablespoons butter, melted
Salt
Pepper

Preheat grill to high heat for direct grilling.

Bring a large pot of salted water to a boil. Add lobster tails and boil 6 minutes. Drain well.

Meanwhile prepare butter sauce. Combine rind and next 7 seven ingredients in a medium bowl. Mix well. Gradually add butter and stir constantly.

Split each lobster tail lengthwise down the underside, making sure not to cut through the back shell.

Brush the flesh side of each lobster tail with oil, some of the butter sauce, salt and pepper.

Grill flesh side down for 3 minutes. Flip over and grill another 3 minutes.

Serve immediately.

Print Recipe

Mexican Street Corn
Adapted from Jam Hands 


4 large ears of corn, dehusked and desilked
Butter
Salt
Pepper
1/2 cup mexican crema
1 1/2 cups queso fresco, crumbled
4 teaspoons ancho chile powder


Preheat oven to 400 degrees.

Brush corn with butter and season with salt and pepper.

Roast in oven for 20-25 minutes.

Brush with mexican crema.

Roll in queso fresco.

Season with ancho chili powder.

Print Recipe

This recipe is linked on: Foodie FridayShow and Tell SaturdayStrut Your Stuff Saturday,  Kitchen Fun with my 3 Sons,  Rediscovering Lost Arts From Our Mothers Mix it Up MondaysMelt in your Mouth Mondays,  On the Menu Monday,  Show me Your Plaid Mondays, Mop It Up MondayMeal Time Monday

Thursday, April 11, 2013

Artichokes Parmesan

My in-laws, Dave and Linda, always bring me artichokes when they are in season. I first started liking them when Phil and I first moved back from California. We lived with his parents for a while and Linda always made artichokes when they were in season. We would just dip them in olive oil with either salt and pepper or garlic salt. This was was first stuffed artichoke I have ever had. The recipe called to cut the artichokes in half and then top them with the bread crumb mixture. I think next time I would leave them whole, dig out the middle and stuff that way. I found it hard to eat as I usually pull the leaves off from the outside in. So, it was hard to get the topping on every bite. It was really good though, just very messy.

Artichokes Parmesan
 Adapted from Better Homes and Gardens

3 medium artichokes
Lemon Juice
1 cup bread crumbs
1 cup diced tomatoes
1/4 cup grated parmesan
2 teaspoons minced garlic
Dried parsley
Olive oil
Salt

Wash artichokes. Remove stems and outer leaves. Snip any sharp pieces off tops of leaves. Cut in half lengthwise.

Brush with lemon juice.

Fill a large pot with a couple inches of water. Bring water to a boil. Boil artichokes covered for 20 minutes.

With about 5 minutes left, preheat oven to 375 degrees.

Combine bread crumbs, tomato, parmesan cheese and garlic in a bowl.

Once artichokes are done boiling, remove center leaves and fuzzy choke.

Sprinkle artichokes with salt.

Top with bread crumb mixture. Then drizzle with olive oil.

Place in a 9 x 13 baking dish and cover with foil.

Bake for 15 minutes. Then remove the foil and bake another 10 minutes.

Top with dried parsley.

Print Recipe

This recipe is linked on:  Full Plate ThursdayLink it Up ThursdayThriving on ThursdaysTasty Thursdays Foodie Friday, Foodie Friaday

Monday, February 4, 2013

Green Beans Gremolata

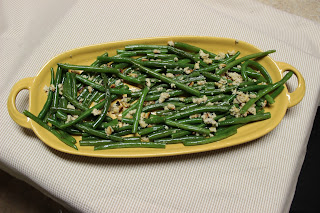
As promised here is the green beans gremolata recipe that I made a few weeks ago with the chicken and mushrooms. This week I served the beans with Guy Fieri's Cajun Pork Loin. If you have not gotten any of Guy's pre-packaged meat at Target you should definitely do so. He has Carne Asada, Cajun Pork Loin, Tri Tip and a chicken for sure. Not sure what else he has but they are packed with a lot of flavor. Back to the beans. I really really like this dish. It has great presentation and a lot of flavor. It would be good for a fancy dinner as well just because it looks so nice on the plate. I love the flavor that the toasted pine nuts and lemon give this dish. This time around I did not have a lemon so I just used lemon juice, but I am putting the lemon zest in the recipe below.

Green Beans Gremolata
Adapted from Ina Garten

1 pound green beans, trimmed
2 teaspoons minced garlic
1 tablespoon lemon zest
1 tablespoon dried parsley
3 tablespoons parmesan cheese
2 tablespoons toasted pine nuts
2 1/2 tablespoons olive oil
Salt
Pepper

Bring a pot of water to boil. Add beans and blanch for 4 minutes.

Drain beans in a colander and immediatley put in ice water to stop the cooking.

Meanwhile toss garlic, lemon zest, parsley, parmesan and pine nuts in a bowl and set aside.

When ready to serve heat olive oil in a large skillet over medium high heat. Drain the beans and pat dry. Add beans to pan and season with salt and pepper. Saute for 4-5 minutes.

Off heat add parmesan mixture.

Print Recipe

This recipe is linked on:  Mix it Up MondaysMelt in your Mouth MondaysOn the Menu Monday,  Show me Your Plaid Mondays


Sunday, January 6, 2013

Broccoli Slaw with Cranberries and Almonds


 I am always looking for new side dishes. I feel like I fall into the same old trap of sweet potatoes, corn, broccoli, green beans, beans....etc..you know the drill. I recently made an oriental coleslaw that came out really good, so when I saw the broccoli slaw at the store I thought I would try to do something similar.

Neither Phil or I are big mayonnaise fans so I wanted to find a recipe that was more vinegar based. I found this recipe on The Perfect Pantry. I really liked the idea of using cranberries and almonds in the slaw. The original recipe called to use Greek yogurt, but I did not have any on hand, so I figured sour cream would be a good substitute. I also decided to add toasted sesame oil because I absolutely love the flavor of it. The slaw came out really really good. It was a great side dish to chicken and I think I will file that away for a party someday as I think it would be easy to make for a lot of people.

Broccoli Slaw with Cranberries and Almonds
Adapted from The Perfect Pantry

1/4 cup raw slivered almonds
1 12oz package broccoli slaw
1/2 cup dried cranberries
3 tablespoons olive oil
3 tablespoons rice vinegar
3 tablespoons honey
3 tablespoons sour cream
1 1/2 teaspoons Dijon mustard
1/2 teaspoon sesame oil
Salt
Pepper

In a small frying pan toast up the almonds over medium heat. About 4 minutes.

In a large bowl add broccoli slaw and cranberries. Set aside.

In a medium bowl, whisk together olive oil, vinegar, honey, sour cream, mustard, sesame oil, salt and pepper.

Combine dressing with broccoli slaw. Top with almonds and mix well.

Let sit at least 30 minutes or up to 4 hours. (Does not have to be refrigerated).

Print Recipe

This recipe is linked on:   Foodie FridayShow and Tell SaturdayStrut Your Stuff SaturdayFoodie FridayKitchen Fun with my 3 SonsWeekend Potluck Church SupperCream of the CropSundae Scoop 


Monday, December 31, 2012

Sort of Hoppin' John


In the south it is a tradition to eat black eyed peas on New Years Day for good luck the rest of the year. We ate ours a day early. I have never had black eyed peas before and always thought they would not be good because I thought they looked funny. I feel like I have been saying that a lot lately! Just means I am getting more adventurous in my eating and cooking. Still no onions or seafood though. All in one week I added split pea soup, black eyed peas and biscuits and gravy to my like list. That's pretty good for me considering only a few short years ago I wouldn't think about trying anything I did not think I could possibly like.

I called this sort of hoppin' john because a traditional hoppin' john has bacon and onion in it. The recipe that I used I got from Plain Chicken. I liked the recipe because it was made in the slow cooker. Also it used ham, which I thought would be nice with the black eyed peas. I did add celery salt and garlic powder to the original recipe to add a touch more flavor. Overall it came out alright. Not my favorite recipe to date. Hopefully, even though we ate it a day early it will bring us some luck in the New Year anyway!

Sort of Hoppin' John
Adapted from Plain Chicken

1 pound dried black eyed peas
8 ounces diced ham
4 cups chicken broth
2 cups water
1 teaspoon celery salt
1 teaspoon garlic powder

Rinse black eyed peas and put in crock pot. Add all ingredients and cook on low for 8-10 hours.

Print Recipe

This recipe is linked on: Mix it Up MondaysMelt in your Mouth MondaysOn the Menu Monday,  Makin You Crave MondayYour Creative Time Out

Tuesday, December 4, 2012

Roasted Squash Wedges

Cookbook Recipe #26

I don't know about you but I get sick of the same old side dishes over and over again. I am trying to make side dishes based on what is in season. Right now its squash. I knew we were going to have roast chicken so I was looking for something to go with it. I found this recipe for roasted squash wedges in the Martha Stewart Living Cookbook. I feel like having a Martha Stewart cookbook is essential, just like having a Julia Child cookbook. This cookbook has elevated versions of classic recipes. Recipes using the ingredients that are in the stores now that were not as ready available in stores years ago. I always think it is interesting to look at cookbooks then and now, they are the same but so different.

Back to the squash....I had never made acorn squash before, so I was excited to try something knew. Those suckers are hard to cut open, let me tell you. Phil and to slice them for me into the wedges. They came out very good.  I would maybe add a little brown sugar next time to make them a little bit sweeter.

Roasted Squash Wedges
Adapted from the Martha Stewart Living Cookbook: The New Classics

2 acorn squash
2 tablespoons butter, melted
2 tablespoons honey
1 teaspoon ground cinnamon
1/2 teaspoon coarse salt
1/4 teaspoon pepper


Preheat oven to 400 degrees.

Cut squash in half through the stem. Remove seeds. Then cut each half into 3 wedges.

Place in a large roasting pan.

In a small bowl, mix remaining ingredients. Brush onto squash wedges.

Cook for 35 to 45 minutes until tender.

 Print Recipe

This recipe is linked on:  Tempt My Tummy TuesdayTotally Tasty TuesdaysTasty Tuesday PartyTalent Show Tuesdays


Monday, December 3, 2012

Oriental Slaw

I think this slaw recipe is a staple at a lot of parties and I always really like it. I love the crunch that the ramen noodles give the salad too. I bought these Asian beef skewers at Super Target the other day and I was trying to figure out something to go with them. I thought the Oriental slaw would be a good side dish that would pair well with the beef skewers.

I changed a couple of things to the original recipe. I added sesame oil, soy sauce and sunflower seeds. I really love the flavor of sesame oil. The only thing I would change would be to put in a little less vinegar. I thought the vinegar flavor was a little too strong in the dish. Other than than Phil and I really enjoyed the slaw.

Oriental Slaw
Adapted from Cooks.com

1 Cup olive oil
1/2 Cup sugar
1/3 cup cider vinegar
1 Tablespoon sesame oil
1 Tablespoon soy sauce
2 Packages seasoning from ramen noodles
1 Pound coleslaw
2 Packages Oriental ramen noodles
1 Cup sunflower seeds

Mix all ingredients in a large bowl and refrigerate for at least an hour but better if overnight.

This recipe is linked on: Mix it Up MondaysMelt in your Mouth MondaysOn the Menu Monday,  Makin You Crave MondayOr So she SaysRecipe Sharing Monday


Saturday, November 17, 2012

Apricot Cranberry Chutney

My dad and my brother came in to town this weekend. I figured because they were in town so close to Thanksgiving that I would make Thanksgiving dinner for them and then I also invited over the in-laws. We had enough food for an army that's for sure. But it would not be my style if I did not have enough food for an army.

Phil's dad brought us over his turkey fryer so we deep fried our first turkey. Phil first injected it with creole butter and rubbed the outside with creole seasoning. We love the creole butter for injecting into roast chickens so we figured it would be really good in the turkey as well.

Here are some shots of the action:

Phil's Dad Dave making sure the fryer will be level
                                                  Phil and Dave lighting the fryer


Phil putting the turkey on the fryer


Phil just messing around,getting prepared case!


Cooking the turkey


Our spread, way too much food!


We had the deep fried turkey, brown sugar and mustard glazed spiral ham, corn, creamy mashed potatoes, apricot cranberry chutney, crescent rolls and pumpkin cake roll for dessert. 

Our chef at my work made the apricot cranberry chutney last year at our Thanksgiving lunch. It was so good that I asked him for the recipe. So I ended up making it for our friends Thanksgiving last year after I had it at work and everyone really liked it. My brother says that it tastes like you would think potpourri would taste like. Which sounds so disgusting but it is a very good comparison because it does have a very sensual taste.
It is a good new twist to cranberry sauce. 

Apricot Cranberry Chutney
Adapted from Food.com  

1/3 cup diced dried apricots
1 (12oz) package craisins
1/2 cup golden raisins
3/4 teaspoon cinnamon
1/4 teaspoon ground ginger
1/4 teaspoon ground allspice
1 pinch ground cloves
1 1/2 cup water
1 cup sugar
2 tablespoons cider vinegar

In a medium bowl mix together the apricots, cranberries, raisins, cinnamon, ginger, allspice and cloves. 

In a saucepan boil the water with the sugar until sugar is dissolved. 

Add in the dried fruit mixture and vinegar, bring to a boil. 

Reduce heat and simmer for 10 minutes.

Remove from heat and cook for 5 minutes. 


Wednesday, November 14, 2012

PW's Creamy Mashed Potatoes

Cookbook Recipe #23

I would recommend anyone to get the Pioneer Women Cookbooks. I got the first cookbook: The Pioneer Women Cooks last year and I have since signed up for Ree Drummond's blog and have cooked several recipes from both of her cookbooks and her website. Every recipe has been delicious including these mashed potatoes. I have made these potatoes a few times now. The cream cheese just adds a completely new element to the potatoes. You do not even need butter on these potatoes because the flavor is so good. The recipe below is a little different than the one in the cookbook in that the one in the cookbook calls to use 5 pounds of potatoes. I was only feeding 3 people so 5 pounds of potatoes would have been a stretch so below is the recipe for 4 people.

PW's Creamy Mashed Potatoes
Adapted from The Pioneer Women Cooks by Ree Drummond

5 large baby red potatoes, skin on
3 tablespoons of butter
2 ounces cream cheese
1/4 cup milk
1 teaspoon garlic salt
Pepper to taste

Bring a pot of water to boil. Add potatoes and cook, with the lid on, for 20-30 minutes or until the potatoes are fork tender.


Drain water and mash potatoes with the skin on.

Add the rest of ingredients and mash until well combined and creamy.

Print Recipe

Sunday, September 2, 2012

Mashed Cauliflower

My good friend and home town next door neighbor Molly was in town to go to a wedding a couple weeks ago. We were talking about different things that we have cooked recently and she told me about mashed cauliflower. I have seen several recipes for this recently but I wasn't convinced that I would like it. I love cauliflower, but pureed just didn't sound that great to me. Molly told me that she adds goat cheese to hers and it makes it really creamy. So I found a recipe for mashed cauliflower that used goat cheese and gave it a try.

People say that it is supposed to taste like mashed potatoes and that it is a good substitute for it. I wouldn't go so far to say that it tastes like mashed potatoes, but it does have a similar flavor profile. I added garlic to the recipe, because well, I like to add garlic to just about anything that it goes with!

I am always looking for new side dishes because I get tired of the same ole same ole stuff. This recipe will be going on my side rotation for sure.

Mashed Cauliflower
Adapted from Food.com

1 head cauliflower
2 ounces goat cheese
1 tablespoon butter
1/2 tablespoon minced garlic
Salt
Pepper

Cut cauliflower into small chunks. Mix with minced garlic in a microwave safe dish with a lid.

Microwave for 8 minutes.

Combine all other ingredients will cauliflower and blend in a food processor until smooth.

Season with salt and pepper to taste.


Print Recipe

This recipe is linked on: Sunday Link PartyThink Pink SundayCreative Bloggers Party and HopScrumptious SundaysChurch Supper


Monday, July 23, 2012

Roasted Cauliflower

If you have regular Farmer's Markets in your area, I think you should think about checking them out. I need to do a better job at going myself. We have so many of them in the area. The only thing is most of them are at odd times during the week, so it can be tough to go. This weekend I went to a local one that is on Sunday's with my friend Nicole. The markets are a great way of enjoying your local fresh produce. A lot of times there is also vendors selling prepared jams, dressings and sauces as well. It is a good time to stock up on specialty ingredients that you cannot buy at the store.

I have been on a cauliflower kick recently and I saw this purple cauliflower at the market. I have seen the colored ones before but have never tried or made one. I asked the lady selling the produce if it tasted like regular cauliflower and she assured me it would. She was right, it tasted exactly like white cauliflower. I like to roast my cauliflower because I like the crispiness the ends get and it still gets nice and tender in the center.

Roasted Cauliflower
Adapted from Allrecipes


1 tablespoon minced garlic
3 tablespoons olive oil
1/3 cup parmesan cheese
1/2 teaspoon salt
1/2 teaspoon pepper
1 tablespoon dried parsley
1 head cauliflower, cut into florets


Preheat oven to 425 degrees


Spray a large casserole with cooking spray. 


Toss cauliflower and all other ingredients together in casserole.

Bake for 40 minutes or until cauliflower is tender.

Print Recipe


Tuesday, July 3, 2012

Perfect Corn on the Cob

I am from small town Iowa and will always be an Iowa girl at heart. One of my favorite things about the summer is corn on the cob. I have corn on the cob here in Illinois all the time but it still doesn't seem as good as the corn I had growing up in Iowa. 

I remember going down to the gas station near the edge of town and getting corn on the cob from families who sold it out of their trucks. Corn picked that morning is hard to beat. I would sit out on the back porch and help my mom or dad shuck the husks and silk off of all the corn we picked up. I know most people think it is gross but I would think it was cool if I found and ear of corn with a worm hiding under the husk. There would always be at least one ear of corn that had a worm out of the batch we would pick up. There are plenty of farm stands out by where my husband and I live selling corn, but it is just not the same as getting corn from the families selling it out of their trucks. And I still have yet to find a worm in my three years living in Illinois. 

You may notice in my picture..the Butter Boy. How many times does the butter fall off of your knife while you are trying to butter your corn? A lot of cooks will say it is unnecessary to have cooking tools that only serve one purpose. I love the Butter Boy. I think it is a great tool for buttering your corn. The head is curved to fit perfectly over the ear of corn and the butter glides on with ease. Love it!

Anyway......This way of making corn is the way my family always made it growing up and I think it comes out perfect every time. 

Perfect Corn on the Cob

Ingredients:

2 tablespoons Sugar
2 tablespoons Salt
Ears of Corn, husks and silk removed

Fill a large pot full of water. Add sugar and salt to water and bring to a boil. Once boiling add corn and boil, covered for 10 minutes.