Sunday, September 30, 2012

Cheesy Vegetable Chowder

My neighbor Logan had her first annual soup swap today. Everyone was to make 7 quarts of soup and freeze into 6 into one quart containers and reserve one quart for tasting. There were 12 people that came so we all went around and tasted all 12 different soups. Then everyone got a number (1-12) and that was the order we were to pick the soups we wanted to take home. Everyone went home with 6 different soups. With your soup you were also to bring a recipe card with the recipe of the soup you made. I ended up going home with 2 quarts of Pumpkin Squash Soup and 1 quart of Roasted Red Pepper and Tomato, Beef and Vegetable, Pasta Fagoli and Chili. I think it is such an awesome idea because now everyone has 6 quick soups for dinner in the fall.

I brought one of my favorite soups, Cheesy Vegetable Chowder. Now this isn't one for the health nuts! I first saw this recipe made at the first Taste of Home Cooking Show that I went too. It just smelled so amazing that I ended up making it within a week after the show. I really like how versatile this recipe is because you can mix in any vegetables that you like and even if you are not a super big veggie fan the cheesy goodness of the soup should help win you over. I have to apologize I still have not mastered how to take great pictures of soup. It is on my list!

Cheesy Vegetable Chowder
Adapted from the Taste of Home

3 medium carrots, peeled and chopped
8 tablespoons butter, divided
4 cups chicken broth
3 cups broccoli, chopped
1 large potato, peeled and diced
3/4 teaspoon Worchestershire sauce
1 teaspoon celery salt
1 teaspoon onion salt
1/4 teaspoon cayenne pepper
1/4 cup flour
1 12oz can evaporated milk
2 cups shredded cheddar cheese
Salt
Pepper

In a large dutch oven saute carrot in 4 tablespoons butter until tender. Stir in broth, broccoli, potato, Worchestershire, cayenne pepper, onion salt, and celery salt. Bring to a boil.

Reduce heat and over and simmer 15-20 minutes or until vegetables are tender.

Meanwhile in a saucepan, melt remaining butter over medium heat. Whisk in flour and mix until smooth. Gradually whisk in milk. Bring to a boil and cook for 2 minutes. Reduce heat and stir in cheese. Continue to stir until cheese is melted.

Slowly stir cheese sauce into soup. Mix until blended well. Turn heat back up and cook a little bit longer until  desired thickness.

Season with salt and pepper to taste.

Print Recipe

This recipe is linked on:  Foodie Friday, Link it up ThursdayCreative ThursdayFantastic ThursdaySunday Link PartyThink Pink SundayCreative Bloggers Party and HopScrumptious SundaysChurch SupperShow and Tell SaturdayStrut Your Stuff Saturday

Friday, September 28, 2012

Cherry Crisp

Cookbook Recipe #16

For the past four years my mother-in-law Linda and I have gone to the Taste of Home Cooking Show. It is something that I look forward to every year. They cook around 8 recipes and then at the end of the show they draw names and whoever wins gets to take home the recipe and a nice piece of serveware . They also auction off a bunch of other prizes such as cookbooks and cookware. I really enjoy the Taste of Home recipes because they are all submitted by home cooks and then the test kitchen cooks them and decides which ones go in the magazines and cookbooks. So you always know they are going to turn out good. This year we upgraded our tickets to the VIP section, so not only did we get to sit in the
front, but we also got a free cookbook as well. I was really excited about this cookbook because I have been seeing it adverstised a lot. I have already marked several recipes to make in this book but I decided on the one to feature for this cookbook to be Cherry Crisp. Cherry crisp reminds me of eating school lunch because it was one of my favorite desserts that we got. Cherry crisp and when they put frosting in between two graham crackers. Those were the days!

This recipe was super easy. It is made in the microwave so dessert was ready in T minus 10 minutes...gotta love that!The only thing I would change for the next time I make this would be to use less sugar. I felt like it was a little too sweet. But other than that it was very close to the cherry crisp from my childhood days!

Cherry Crisp
Taste of Home Best Loved Recipes

1 21oz can cherry pie filling
3/4 cup packed brown sugar
2/3 cup quick cooking oats
1/3 cup all-purpose flour
1/4 cup butter, cubed

Spoon filling into a greased pie dish.

In a large bowl combine sugar, oats, and flour until well combined.

Cut in butter with a pastry blender until crumbly. Sprinkle over filling.

Microwave for 8 minutes.

Print Recipe

This recipe is linked on: Foodie Friends Friday,  Foodie Friday, Full Plate ThursdayTastetastic ThursdayLink it up ThursdayThriving on ThursdaysCreative ThursdayFantastic Thursday


Tuesday, September 25, 2012

OKTOBERFEST

OKTOBERFEST

It is Oktoberfest in Germany right now until next weekend. So I thought what better to celebrate then with a German inspired dinner. My whole family is German. My parents, nor my grandparents were born there, but my heritage is German. I did not really pay much attention to nationalities until I moved to California and then now Chicago area because nationalities are much more prevalent here. Looking back at some traditions that we had growing up, I now realize that we did them because my family was German. Around Christmas time we always got Advent Calendars from my grandma. The ones that you countdown to Christmas by opening each numbered door, and inside were chocolates. I never knew that those were started by Germans. I find it really cool now to look back at things I never would have thought twice about and realize now why we did them. 

I found this whole menu put together in the most recent issue of Food Network Magazine. I was thumbing through the magazine and the picture just caught my eye. I wanted to make every item on the plate, which does not happen very often. I knew Oktoberfest was coming up so I looked to see exactly when it started and saved it to make this week. On the menu is: Roasted Cornish Game Hens with Pumpkin Seed Pesto, Herbed Spaetzle, and Sweet and Sour Cabbage. 

I have seen several recipes for Spaetzle and have always wanted to try to make it. What a mess! Definitely isn't as easy as it looks or sounds. You are supposed to use a colander to press the dough through into the simmering water to make the dumplings. Well my colander is more like a V because it folds up for easy storage. So I did not think it would work well, so Phil and I tried like 5 different tools to try to get it to work and we ended up just making more dishes then anything else. We ended up getting the V shaped colander to work out. Not a dish that will go into our regular rotation, not because it wasn't good but because it was a pain to make. Nonetheless, the dinner was really great!

Roasted Cornish Game Hens with Pumpkin Seed Pesto
Adapted from Food Network Magazine

5 tablespoons olive oil
1/2 cup pepitas (hulled green pumpkin seeds)
1 teaspoon paprika
1 cup chopped parsley
4 Cornish Game Hens ( I made 2)
1 tablespoon garlic spread
1/2 cup water

Heat 3 tablespoons oil in skillet. Add the pepitas, salt and paprika and cook over medium heat for about 5 minutes. 

Remove from heat and let cool. Once cool transfer to food processor and add parsley and water and pulse until pureed.

Slide your fingers under skin of Cornish hens. Spread pesto under skin of hen. 

Mix garlic spread and remaining 2 tablespoons oil together and spread all over the outside of hens. 

Refrigerate 2 hours or overnight ( I did overnight). 

Preheat oven to 400 degrees. 

Place hens in a shallow roasted pan and tie the legs together with kitchen twine. Roast, rotating the pan halfway through until the skin is golden brown about 1 hour. Let rest 15 minutes. 

Print Recipe

Herbed Spaetzel
Adapted from Food Network Magazine

3 cups flour
2 teaspoons salt
Freshly ground pepper
1 cup sour cream
1 cup seltzer
3 large eggs
1/3 cup fresh dill and parsley
2 tablespoons plus 2 teaspoons olive oil
4 tablespoons butter

Bring a pot of salted water to a simmer.

Combine flour, salt, and pepper in a large bowl. 

In a separate bowl whisk sour cream, seltzer, eggs, and herbs until well mixed. Mix in with flour mixture. 

Fill a large bowl with ice water. 

Working over the simmering water, place 1 cup of dough in the colander and push the dough through with a spatula. Cook the spaetzle for 1 minute after they float to the surface and then remove with a slotted spoon and place in bowl with ice water. Continue this until all the dough is used. 

Drain the spaetzel and spread out on a baking sheet and pat dry with paper towels. Toss with 2 tablespoons olive oil. 

Heat 2 tablespoons butter and 1 tablespoon olive oil in a large skillet over medium high heat. 

Increase heat to high and add the spaetzel in an even layer. Cook until golden brown on bottom, about 5 minutes. Continue cooking until heated through. Season with salt and pepper. 

Print Recipe

Sweet and Sour Cabbage
Adapted from Food Network Magazine

2 tablespoons butter
1 tablespoons minced garlic
4 cups shredded purple cabbage
4 carrots, peeled and cut into 1 inch pieces
3 tablespoons brown sugar
3 tablespoons cider vinegar
1/2 cup water
Salt
Pepper

Melt 2 tablespoons butter in a large skillet over medium heat. Add minced garlic and cook 1 minutes. 

Add carrots, water, sugar, vinegar, salt and pepper to taste. Bring to a simmer. Cover and cook for 15 minutes. 

Stir in 4 cups cabbage and season with salt. Cook for 5 more minutes. 

Print Recipe

This Recipe is linked on:   Mix it Up MondaysMelt in your Mouth MondaysMust Try MondayOn the Menu Monday,  Makin You Crave Monday Slightly Indulgent TuesdayTempt My Tummy TuesdayTrick or Treat TuesdayTotally Tasty TuesdaysTasty Tuesday PartyTalent Show Tuesdays,Foodie Friends Friday,  Foodie Friday, Full Plate ThursdayTastetastic ThursdayLink it up ThursdayThriving on ThursdaysCreative ThursdayFantastic Thursday


Saturday, September 22, 2012

Spiced Apple Cake

I have a hard time trying to follow the food seasons. I tend to just make whatever sounds good to me. I want to try to start using ingredients when they are at their peak. Right now apples are at their peak and I have a ton of Honeycrisp (the best apple their is in my opinion) in my fridge. So, I am trying to come up with different things I can make with the apples. For a few years now I have saved and marked several recipes for apple cakes. I always pull out recipes for the apple cakes to make but never get around to doing so. Well  by golly this weekend I finally made it!

Phil's cousin was in town from Philly and the family was getting together to see him. I thought since I have so many apples I would finally make an apple cake. I mixed the Honeycrisp with Granny Smith in the cake. I feel like you always have to have some Granny Smith when baking otherwise the apples tend to taste bland. The recipe said to leave the cake in the bundt pan for 15 minutes before flipping it out onto a cooling rack to cool. Well 15 minutes is not long enough. A side of the cake crumbles apart when trying to flip because I think it was still to moist. Only good thing about this was that I got to try a taste before everyone tried it. So I would suggest leaving it in the pan at least 30 minutes before inverting it out. The cake still tasted great all the same, everyone said how good it was!

Spiced Apple Cake
Adapted from Giada De Laurentis

4 medium apples (I used 2 Granny Smith and 2 Honeycrisp) cored, peeled and sliced
1 1/2 cups maple syrup
3 eggs, at room temperature
3/4 cup brown sugar
2/4 cup vegetable oil
1 tablespoon vanilla
3 cups flour
1 1/2 teaspoons baking powder
1 1/2 teaspoons baking soda
1 tablespoon cinnamon
1/2 teaspoon ground nutmeg
1/2 teaspoon ginger
1/2 teaspoon salt

Icing:

3 cups powdered sugar
6 tablespoons cream cheese, softened
6 tablespoons milk

Preheat oven to 350 degrees. 

Liberally butter and flour a 10 inch bundt pan.

In a large bowl mix together the apples, maple syrup, sugar, eggs, oil, and vanilla. 

In another bowl mix together flour, baking powder, baking soda, cinnamon, nutmeg, ginger, and salt. 

Mix the dry ingredients into the apple mixture. Pour into the prepared pan and bake until a toothpick comes out clean, about 55 to 60 minutes.

Let cool in pan 30 minutes. Then invert onto a cooling rack and cool an hour. 

Print Recipe


This is what I use to peel apples and it is amazing. I would cut my fingers to shreds trying to peel apples the traditional way. I would suggest this to anyone who bakes a lot with apples:


This recipe is linked on: Show and Tell SaturdayStrut Your Stuff SaturdayFoodie FridayFoodie Friends Friday


Tuesday, September 18, 2012

Pesto Presto Chicken

I got this recipe from Rachael Ray. I really don't understand how she makes a lot of her recipes in 30 minutes. I suppose if you start the time after you have out every single item you may need during the cooking process. But who does that. I get things out as I use them. I consider the time it takes me to find ingredients part of the cooking process. Even so I still think a lot of the recipes are hard to make in 30 minutes.

This one took about an hour from start to finish because you have to pound out the chicken. Make the pesto. Prep the chicken with the pesto, cut the tomato, then bake the chicken. Regardless of the time the recipe is really good. I changed up a couple things in the recipe. The recipe originally called for using Boursin garlic and herb cheese. I already had some Laughing Cow Sun-Dried Tomato and Herb Cheese so I used that instead. Also the pesto didn't seem to want to mix very well so Phil added some olive oil to it and that helped   to smooth it out.

I am on a roll lately with finding good chicken recipes!


Pesto Presto Chicken
Adapted from Rachael Ray

3 tablespoons pine nuts
1/2 cup spinach leaves
1/4 cup parsley leaves
5 wedges Laughing Cow Sun-Dried Tomato and Herb Cheese
1/2 cup grated parmesan cheese
Salt
Pepper
8 slices tomato
5 tablespoons olive oil, divided
4 boneless, skinless chicken breasts, pounded thin

Preheat oven to 450 degrees.

In a small pan over medium heat, toast pine nuts, then set aside to cool.

In a food processor mix spinach, pine nuts, cheese wedges, parsley, 3 tablespoons olive oil, and 1/4 cup parmesan cheese until well combined.

Season chicken breasts with salt and pepper on both sides.

Spread cheese mixture on chicken breasts. Fold chicken breasts over like a book, to enclose cheese mixture.

Place chicken on a nonstick baking sheet.

Top each chicken breast with 2 tomato slices. Drizzle each chicken breast with olive oil and top with leftover parmesan cheese.

Bake for 20 minutes.

Print Recipe

This recipe is linked on:Slightly Indulgent TuesdayTempt My Tummy TuesdayTrick or Treat TuesdayTotally Tasty TuesdaysTasty Tuesday PartyTalent Show TuesdayFoodie Friends Friday,  Foodie Friday,Thriving on ThursdayTastetastic ThursdayFull Plate Thursday 


Monday, September 17, 2012

Apple Crisp

I absolutely love fall. It is my favorite season for sure. The changing of the leaves, the crisp air, the fall candle scents, apples, pumpkins, cozy feeling, more soups! I cook comfort food all year but it always tastes so much better in the fall for some reason. I grew up going apple picking every year with my family. We would go for the afternoon and fill up a couple of bags of apples and always get apple cider and cherry cider. I looked forward to doing so every year. This year I was looking online for places to go apple picking close by our house and so many of the orchards are not even opening this year because of the weather this spring.

One of my favorite kinds of apples is the honeycrisp apple. They have so much flavor, they are unbelievably good! I load up on honeycrisp apples in the fall all of the time because I know they are out for only a short time. Phil loves my apple crisp that I make so I also made this for him last night. So I decided to post it tonight because it was too good to wait to post until I made it again.

I mixed granny smith apples and honeycrisp apples to make this apple crisp. This is the only recipe for apple crisp that calls for using cake mix for the topping. I really like the flavor the cake mix brings to this apple crisp. YUUUMM!!

Apple Crisp
Adapted from the Taste of Home

7 medium tart apples, peeled and thinly sliced
1 cup sugar
1 tablespoon flour
1 teaspoon cinnamon
Dash salt
1/4 cup water
1 9oz package yellow cake mix
3/4 cup quick cooking oats
1/3 cup butter, softened
1/4 cup brown sugar
1/4 teaspoon baking powder
1/4 teaspoon baking soda

Preheat oven to 350 degrees.

Place apples in a greased 2 1/2 quart baking dish.

In a small bowl mix sugar, flour, cinnamon, and salt. Sprinkle over apples. Drizzle with water.

In a large bowl combine cake mix, oats, butter, brown sugar, baking powder and baking soda. Sprinkle over apples.

Bake uncovered for 45-50 minutes.


Print Recipe

This recipe is linked on: Mix it Up MondaysMelt in your Mouth MondaysMust Try MondayOn the Menu MondayMouth Watering MondayMakin You Crave Monday

Sunday, September 16, 2012

Chicken Pot Pie

Cookbook Recipe #15

Phil got back from his fishing trip and I wanted to make one of our favorite meals for him, chicken pot pie.

Lets take a trip down memory lane and talk about the first time I ever tried to make chicken pot pie.  I was so excited to make this because it seemed super simple and I knew that I was going to feel proud of it coming out of the oven all golden brown and the chicken all creamy. Well that is not quite what happened. I missed a little step in the directions that said the chicken was supposed to be cooked before putting it in the pie. Whoopps!! It smelled so good and Phil and I were anticipating how awesome it was going to be. We took it out of the oven and it was not creamy, but sooo soupy. I was so defeated and also starving because I was getting so hungry thinking about this pot pie. Phil and I kept trying to figure out what to do for dinner now, that the pot pie was ruined. And you know how when you have something in mind that you want, then nothing can possibly be good now if you can not have what you originally wanted. Well we ended up settling for KFC, it was good, but not as good as pot pie would have been.

Since then I have made several pot pies, with the chicken cooked before it goes in the pie, and they always come out amazing. I have never strayed from this recipe because I like it so much. I have found several different versions that I have wanted to try...I am sure at some point you will see one of those in this blog.

The original recipe from the Campbell's cookbook says to use all purpose baking mix to make the crust. I just use a refrigerated crust because I think they taste very similar to homemade and are super easy to use.
One thing that I have learned when using the refrigerated crust is that you definitely have to let the crust sit out for at least 10-15 minutes before unrolling it or it will rip to shreds.

Hope you all enjoy this recipe as much as Phil and I do!

Chicken Pot Pie
Campbell's 1-2-3 Dinner

1 refrigerated pie crust
3 boneless skinless chicken breasts, cubed
1 (10 3/4oz) can cream of chicken
1 16oz bag frozen vegetables, thawed
Salt
Pepper


Let refrigerated pie crust thaw on counter according to package directions.

Preheat oven to 450 degrees.

Cook chicken in skillet for about 10 minutes, or until no longer pink.

In a large mixing bowl mix thawed vegetables, chicken, cream of chicken and salt and pepper.

Unroll one of the pie crusts and place it in a pie pan. Mold it to the bottom the the pie pan.

Pour the chicken mixture into pie pan.

Unroll other crust and lay it on top of pie pan. Crimp edges together.

Make 4 slits on top of pie crust to vent the pie.

Take small pieces of tin foil and wrap around edges only to keep from getting to brown.

Bake in oven for 25 minutes. Remove tin foil and bake another 10 minutes.

Print Recipe

This recipe is linked on: Sunday Link PartyThink Pink SundayCreative Bloggers Party and HopScrumptious SundaysChurch SupperMix it Up Mondays

Wednesday, September 12, 2012

Indoor S'more Sundaes

As you all know my husband Phil is away on a fishing trip this week so I did a girls night with Phil's aunt Cindy and her daughter Katelyn. Cindy's husband Ken is one of the guys who is completely obsessed with the fishing trip. He was like a kid on Christmas morning the night before they left for their trip, he was so excited about fishing!

For dinner I made Jambalaya ( which I will post another time), a spinach salad, and dessert of the Indoor S'more Sundaes. The s'more sundaes are one of my favorite desserts to make for guests because it can be made in advance. I always feel so bad when I have guests and I am in the kitchen making dessert for a long time after dinner. This is a super easy recipe and I think it is impressive to. It looks much fancier than it is to make, which is always nice when you have guests because it makes you look like you really know what you are doing.

I was really apprehensive the first time I ever made these because putting ice cream in the oven sounds like a messy idea to me. But it is in the oven only long enough to make the marshmallows ooey gooey and scrumptious. The only thing I changed about the original recipe was that I just used Hersey's chocolate syrup instead of making it homemade. I absolutely love this recipe, can you tell?!?!

Indoor S'more Sundae's
Adapted from Melissa D'Arabian

Graham Cracker Crust:

3/4 cup graham cracker crumbs
3 tablespoons butter, melted
2 tablespoons sugar
1/2 teaspoon cinnamon
Salt

4 scoops vanilla ice cream
1 1/2 cups mini marshmallows
Hersey's chocolate syrup

In a large bowl mic the graham cracker crumbs, butter, sugar, cinnamon and a sprinkle of sat.

Firmly press the crust into muffin tins to make individual crusts.

Top each crust with a scoop of vanilla ice cream.

Press the mini marshmallows into the ice cream, covering the scoop completely. You will have 4 s'more cups.

Freeze at least 1 hour.

Preheat broiler on low.

Place s'more cups under broiler for 30 seconds to a couple minutes, depending on your oven, until the marshmallows start to brown.

Top with chocolate sauce.

Print Recipe

This recipe is linked on: What's Cooking WednesdayCast Party WednesdayWhimsy WednesdayThriving on ThursdayTastetastic ThursdayFull Plate Thursday


Monday, September 10, 2012

Chicken and Dumplings

Cookbook Recipe #14

There are so many versions of chicken and dumplings. Versions when the only ingredients are chicken and dumplings in a thick creamy sauce or in sauce with vegetables, or chicken and dumplings in a soup. I bet you can't guess which type I like best?!

This is my favorite recipe that I have found so far for chicken and dumplings. It is from Semi-Homemade with Sandra Lee: The Complete Cookbook.This is an awesome cookbook because there are so many recipes that use time saving ingredients. I love when a dish tastes like all the components are homemade, when they really are not, especially because people will think that they are homemade. I also like that Sandra Lee cuts out a lot of steps in her recipes with the ingredients that she uses. For instance in this recipe she uses canned gravy to give a rich flavor to the soup instead of making a base from scratch. Also she uses Pillsbury Grands Biscuits for the dumplings instead of making them from scratch. Sooo easy! I really enjoy these dumpling because they puff up really big and they absorb all the flavor of the broth into them.


The only things I changed for this recipe were that I used celery salt instead of celery and cut the onions of course, out of the dish to appease my own palate. Phil and I really like the richness of this dish with the gravy and soft, broth soaked dumplings.

Chicken and Dumplings
Adapted from Semi-Homemade with Sandra Lee: The Complete Cookbook


1 Rotisserie Chicken, shredded
2 tablespoons vegetable oil
3 carrots, peeled and diced
6 cups chicken broth
2 teaspoons poultry seasoning
1 teaspoon celery salt
Salt
Pepper
1 16.3oz container refrigerated Pillsbury Grands biscuits
1 14oz can Campbell's Chicken Gravy
Flour for dusting

In a large dutch oven heat oil over medium heat. Add carrots and cook for 10 minutes, until soft.

Add broth, poultry seasoning, celery salt, and salt and pepper to taste. Add shredded chicken. Bring to a boil.

Reduce heat and simmer for 30 minutes.

While the soup cooks, start the dumplings. Lightly flour a surface. Roll each biscuit into 1/4 inch thick pieces. Cut each into 1 inch wide strips. Set aside.

Stir chicken gravy into soup. Add dumplings and cover. Simmer for 10 more minutes.

Print Recipe


Sunday, September 9, 2012

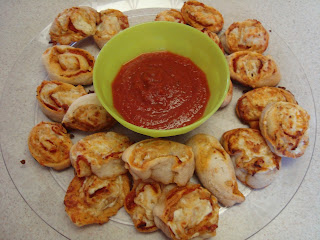
Pizza Rolls

Every year our family friends have a tailgate party at their house for a Chicago Bears game. This year they decided to have it for the first Bears game of the year. It is always nerve wrecking when you are a Chicago fan for the first game because you never know how the season is going to go. The Bears showed up today, so the season is getting off to a great start! Go Bears!!

Everyone always brings a dish to the tailgate party. I was looking at a lot of different appetizers to bring and I settled on Pizza Rolls. I have never made anything like these before. You basically make a pizza and then roll it up into a log. It was super easy until it came time to cut the log. The ingredients did not want to stay in a nice pinwheel very well. But I haphazardly put them together and they came out pretty good once they were baked. When I took them out to serve, they were gone in under five minutes! Everyone really liked them. And they are very kid friendly. I mean what kid doesn't like pizza?

Pizza Rolls
Adapted from Tidy Mom

2 cans refrigerated pizza crust
Italian Seasoning, to taste
Garlic salt, 2 taste
1 cup sliced pepperoni
1/4 cup pizza sauce, plus more for dipping
2 cups shredded mozzarella cheese
1/2 cup Parmesan cheese

Preheat oven to 425 degrees.

Dust flour on flat surface. Roll out each pizza crust.

Using a basting brush, brush pizza sauce lightly on each pizza crust.

Season with garlic salt and Italian seasoning.

Top with pepperoni and cheeses.

Starting with short end, roll each pizza crust tightly into a log.

Slice each log into 1 inch sections.

Place on a lightly greased baking sheet and bake for 10-12 minutes.

Serve with pizza sauce for dipping.

Print Recipe

This recipe is linked on:  Sunday Link PartyThink Pink SundayCreative Bloggers Party and HopScrumptious SundaysChurch Supper


Thursday, September 6, 2012

Zucchini Bread

My friend and coworker Nicole brought in Zucchini Bread last week to work. I had never tried it before and was a little apprehensive because zucchini in bread just does not sound good. The bread was delicious and you could not taste the zucchini at all. So I asked Nicole for the recipe because I thought it would be a great recipe to make for Phil's fishing trip.

Every year Phil, his dad, his uncles and some of their friends go on a fishing trip in Northern Minnesota for a week. They always go the same week in September and for the past few years they have been going to their friends resort in Minnesota. This is only the second year Phil has attended so I have not been around to hear all the crazy talk that goes down the year before the fishing trip. I guess the guys used to nonstop talk about this fishing trip for a whole year, so the wives finally decided that they could not breath a word about it until the 4th of July. The ladies felt as if the guys were wishing their whole summer away looking forward to the trip. I think the guys are bursting at the seams until the 4th over this trip! So in recent weeks many pictures of fish have been texted, dozens of emails sent about who is bringing what, who is driving whose cars and making sure they have all the supplies they need. 

Because Phil is so new to the trip we are not asked yet to provide a dish. I decided to make the Zucchini Bread anyway because I thought it would be a nice quick breakfast for them in the wee morning hours. The recipe is from Weight Watchers so it is a healthy version, but you would never know it, which makes it even better! The recipe makes two loaves, which I thought would be a good amount for their trip. But I could not let them take all the bread and have none for myself, so I doubled the recipe and made four loaves. Some for the freezer for later! The recipe below is the original recipe for two loaves. 

Zucchini Bread
Weight Watchers

2 cups whole wheat flour
2/3 cup all purpose flour
1 teaspoon salt
1 teaspoon baking soda
1/2 teaspoon baking powder
1 tablespoon ground cinnamon
3 egg whites
1 egg
1 cup sugar
2 teaspoons vanilla extract
1/3 cup canola oil
2/3 cup unsweetened applesauce
2 cups uncooked zucchini, peeled, grated and drained
1/2 cup raisins
Cooking spray

Preheat oven to 350 degrees. 

Coat two loaf pans with cooking spray, set aside.

In a large bowl sift together whole-wheat flour, all-purpose flour, salt baking soda, baking powder and cinnamon. Set aside.

In a bowl of a stand mixer beat egg whites until frothy. Add egg, sugar, vanilla, oil, and applesauce and mix well. Add in zucchini. 

Add the dry ingredients to mixer and mix well. Add raisins. 

Pour batter into prepared loaf pans. Bake 50-60 minutes. 


Wednesday, September 5, 2012

Chai Latte Cupcakes

My General Managers last day is tomorrow because he is being promoted. He is a big fan of Starbuck's Chai Tea Latte's. We always know when he has had one as he gets overly talkative and seems very jittery. It is really funny! So I thought what would be more appropriate for his last day then to make Chai Latte Cupcakes.

I saw Starbucks flavored cupcakes first on Kimz Kitchen. I got the idea from her blog to make the cupcakes look like a Starbucks Frappacino's. I bought just white paper cups and trimmed them down to the size of the cupcakes. Then I found the Starbucks logo online and cut them out and pasted them on the cups. I stopped by Starbucks and asked if I could have several of their straws and trimmed them down to go on the top. I definitely can say it is the most visually creative thing I have ever made!

I have a knack for making a big mess in the kitchen for sure. I had frosting everywhere! I definitely have not figured out the trick to piping frosting out of a cake decorating bag, as I think I had more all over my hands and counter then I did on the actual cupcakes. Oh well, I am still pretty proud of myself!

Chai Latte Cupcakes
Adapted from Kimz Kitchen and Betty Crocker

Cupcakes:

1 box Betty Crocker SuperMoist French Vanilla cake Mix
( water, eggs and vegetable oil called for on cake mix box)
1 1/2 (1oz) packages instant chai tea latte mix

Frosting:

1 cup white vanilla baking chips
1 container Betty Crocker Rich and Creamy White Frosting
Ground Cinnamon

Heat oven to 325 degrees (for nonstick).

Place paper cupcake liners in each of 24 regular size muffin cups.

Make and bake cake mix as directed on the box for 24 cupcakes.

Cool completely for 30 minutes.

In a microwavable bowl melt baking chips for 30 seconds. Repeat, if necessary until chips are melted. Cool 5 minutes. Stir in frosting until well combined.

Frost immediately.

Top with cinnamon.

Print Recipe

This recipe is linked on: What's Cooking WednesdayCast Party WednesdayWhimsy WednesdayFantastic ThursdayCreative ThursdayThriving on ThursdayLink it Up ThursdayTastetastic ThursdayFull Plate Thursday


Tuesday, September 4, 2012

Tequila Lime Chicken

Cookbook Recipe #13


I think I have mentioned before that I really like Ree Drummond, the Pioneer Women. All her recipes are down home southern cooking, which is my favorite.  Ree started the website the Tasty Kitchen along with her blog the Pioneer Women and now she has cookbooks and her own show on the Food Network. I really enjoy the layout of her books because she talks about life on her ranch and where her recipes come from. The Tequila Lime Chicken recipe comes from her second cookbook, which Phil got me for my birthday this year. I was soooo excited when it came out because I loved her first book so much!


The recipe calls for marinating the chicken for several hours or overnight and I completely spaced out about it so Phil took the reigns and cooked dinner for us. When I asked him to marinade the chicken I kindly asked him to leave out the cilantro. I told him to either make two marinades or leave it out completely because I can't stand cilantro. I like it tastes like soap, which I hear is an actual thing that some people have. I guess a select few people have some sort of gene that makes cilantro taste like soap to them, and I am one of those people, but Phil is not as he absolutely loves cilantro. So he ended up making two separate marinades. What a sweet guy!

This recipe called for 3/4 a cup of tequila so we thought it was going to taste like a shot but it didn't, it came out very flavorful and juicy. Phil also made a few holes in the chicken with a fork to get the marinade to soak in well and I think that helped make the flavor stick. Phil made a delicious dish tonight, the only think I can take credit for is the plating! We served the chicken with Spanish rice and refried black beans. A great meal all around!

Tequila Lime Chicken
Adapted from The Pioneer Women Cooks: Food From My Frontier by Ree Drummond

For the Marinade:

3 limes
3 garlic cloves, peeled
2 Serrano Chiles, de-seeded
1 teaspoon kosher salt
1/2 cup cilantro
5 tablespoons olive oil
3/4 cup tequila


Boneless skinless chicken breasts

Toppings:

Pico de gallo
Avocado
Monterrey Jack Cheese Slices

In a food processor add the juice of the limes, garlic cloves, Serrano Chiles, salt, olive oil, cilantro (or leave out if you have the soap gene) and tequila and process until smooth. Pour over chicken breasts in a resealable bag and marinate in fridge for several hours or overnight.

Grill chicken on direct high heat for 6 minutes per side, or until chicken is no longer pink. With a couple minutes left, if you choose, melt Monterrey Jack cheese on chicken.

Top with avocado and pico de gallo.

Print Recipe


This recipe is linked on: Slightly Indulgent TuesdayTempt My Tummy TuesdayTrick or Treat TuesdayTotally Tasty TuesdaysTasty Tuesday PartyFull Plate ThursdayTastetastic ThursdayLink it Up ThursdayThriving on ThursdayCreative ThursdayFantastic Thursday


Monday, September 3, 2012

Wonton Soup


I think my favorite part of getting Chinese food is the soup. I love the Chinese soups; hot and sour, wonton, sizzling rice soup and egg drop. I have tried to make all but sizzling rice at home. The wonton always comes out the best.

My mom used to make this recipe at home once and awhile, I always loved it. She gave me the recipe when I went to college and I started making it a lot. It can be very tedious to make though. The soup itself only takes a few minutes, but putting together the wontons can take awhile. I feel like they do not hold a whole lot so you end up making a ton of them. You have to be very careful when you boil these not to over cook them. I have over cooked them a couple times and you end up with a really messy soup as the wontons all break open and spill out all the contents. The recipe calls for green onions to go in with the pork, but of course I leave those out. I'm sure it would be a good flavor addition, if you like that sort of thing!

Wonton Soup
Adapted from Betty Crocker

For the wontons:

1/2 pound ground pork, cooked
2 teaspoons soy sauce
1/2 teaspoon corn starch
1/4 teaspoon ginger
1/4 teaspoon salt
24 wonton skins


2 tablespoons soy sauce
6 cups chicken broth
2 cups water
1 tablespoon chicken bouillon
1 cup spinach, torn into small pieces

In a bowl combine cooked pork, soy sauce, corn starch, ginger, and salt and mix well. 

Meanwhile, in a large pot heat up chicken broth, water, soy sauce and chicken bouillon at medium heat. 

Spoon 1 teaspoon pork mixture into middle of each wonton skin. Moisten edges of wonton skin with water. Fold each skin in half to form a triangle. Press edges to seal. Pull bottom corners of triangle down and overlap slightly. Moisten one corner with water and pinch to seal. Set wontons aside. 

Once broth is heated up add spinach and bring to boil. Once boiling add wontons and reduce heat to a simmer. Simmer wontons for 2 minutes. 


Sunday, September 2, 2012

Mashed Cauliflower

My good friend and home town next door neighbor Molly was in town to go to a wedding a couple weeks ago. We were talking about different things that we have cooked recently and she told me about mashed cauliflower. I have seen several recipes for this recently but I wasn't convinced that I would like it. I love cauliflower, but pureed just didn't sound that great to me. Molly told me that she adds goat cheese to hers and it makes it really creamy. So I found a recipe for mashed cauliflower that used goat cheese and gave it a try.

People say that it is supposed to taste like mashed potatoes and that it is a good substitute for it. I wouldn't go so far to say that it tastes like mashed potatoes, but it does have a similar flavor profile. I added garlic to the recipe, because well, I like to add garlic to just about anything that it goes with!

I am always looking for new side dishes because I get tired of the same ole same ole stuff. This recipe will be going on my side rotation for sure.

Mashed Cauliflower
Adapted from Food.com

1 head cauliflower
2 ounces goat cheese
1 tablespoon butter
1/2 tablespoon minced garlic
Salt
Pepper

Cut cauliflower into small chunks. Mix with minced garlic in a microwave safe dish with a lid.

Microwave for 8 minutes.

Combine all other ingredients will cauliflower and blend in a food processor until smooth.

Season with salt and pepper to taste.


Print Recipe

This recipe is linked on: Sunday Link PartyThink Pink SundayCreative Bloggers Party and HopScrumptious SundaysChurch Supper


Saturday, September 1, 2012

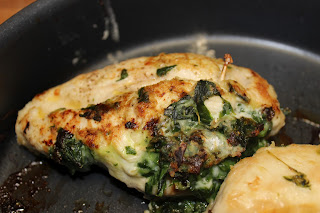
Spinach and Cheese Stuffed Chicken

Cookbook Recipe #12

Melissa D'Arabian is another Food Network chef that I watch a lot. She makes a lot of really easy and few ingredient recipes because they are all supposed to feed a family of four for under $10. I agree that a lot of her recipes use ingredients that most people have on hand, but if you do not have some of the key ingredients on had the recipe cannot be made for 2 people for under $10, let alone 4 people. Though I may not agree that all the recipes are cheap, I do like her recipes none the less. So I was very excited when she came out with her first cookbook last month.

I decided to make the Spinach and Cheese Stuffed chicken for this cookbook recipe. I made this recipe Thursday night but have been unable to post because our computer was back in the shop getting a new hard drive. Oddly enough my computer at work also has to be cleaned off completely this week. So, don't let me touch your computers!

I changed the recipe up quite a bit as the original called to use cream cheese to make a homemade creamed spinach. I decided to just use frozen creamed spinach and skip that step all together. Phil and I really liked this recipe, it was so easy and took no time to make.

Spinach and Cheese Stuffed Chicken
Adapted from Ten Dollar Dinners by Melissa D'Arabian

1 box Green Giant creamed spinach, thawed
Boneless skinless chicken breasts, about 6-8oz each
1 tablespoon butter
1/2 cup shredded mozzarella cheese
Lemon Juice, to taste
Salt
Pepper
1/4 cup flour
Garlic salt, to taste
2 tablespoons olive oil


Preheat oven to 375 degrees.

Cut a pocket into each chicken breast. Cut just about all the way through the chicken (you want to stuff as much spinach inside as possible!)

In a small bowl mix thawed cream spinach, mozzarella cheese and garlic salt. Stuff spinach into pocket of the chicken. Using toothpicks, thread the pocket closed to keep as much spinach mixture in chicken as possible.

Season both sides of chicken with salt and pepper.

Place flour in a shallow dish. Dip chicken in flour and coat both sides of chicken.

Heat olive oil in a large oven safe skillet over medium high heat. Add chicken breasts and cook until browned 4-5 minutes on one side and 3 minutes more on other side.

Drizzle chicken with lemon juice and place half a tablespoon of butter on each chicken breast.

Bake for 15 minutes in oven.

Serve drizzled with sauce from pan.

Print Recipe

This Recipe is linked on: Show and Tell SaturdayStrut Your Stuff SaturdayFoodie FridayFriday FavoritesFoodie Friends Friday