Showing posts with label Dessert. Show all posts

Friday, August 2, 2013

Red Velvet Whoopee Pies

Cookbook Recipe #59

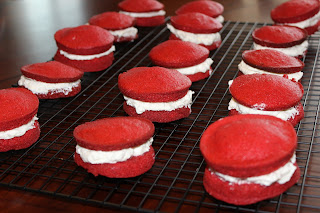
I have been wanting to make whoopee pies for awhile now. I bought whoopee pie pans last year with the intention of making them. Yeeaaa it never happened. Phil and I were going over to a friends house last weekend and I was looking for something to make for dessert that didn't have to go in the oven or stay frozen because we had to travel a bit. I thought, I will finally make whoopee pies. I came across these red velvet whoopee pies in Paula Deen's cookbook. I love anything red velvet so I thought they would be perfect. I had never had a whoopee pie so I didn't know what they were supposed to taste like. They came out pretty good. I thought the cream filling would be sweeter then it was, but they were still good. They were a lot easier then I thought as well, which is always nice for a dessert.

Cousin Johnnie's Red Velvet Whoopee Pies
Recipe from The Deen Family Cookbook by Paula Deen
Pies

3 cups flour
1 teaspoon baking soda
2 teaspoons cocoa powder
1 1/2 cups canola oil
1 teaspoon white vinegar
One 1 ounce bottle red food coloring
1/2 teaspoon vanilla
1 1/2 cups sugar
2 eggs
1 cup buttermilk

Filling

5 tablespoons all purpose flour
1 cup milk
1 cup sugar
8 tablespoons butter, softened
1/2 cup solid vegetable shortening
1 teaspoon vanilla

Preheat oven to 350 degrees.

Lightly grease whoopee pie pans, or cookie sheet.

Sift flour, baking soda, and cocoa together.

In another bowl combine oil, vinegar, food coloring and vanilla.

In an electric mixer beat the sugar and eggs together until they turn pale and double in volume. Add the oil mixture and mix to combine. Add the flour mixture and buttermilk alternately in five small additions, starting and ending with flour.

Drop the batter by tablespoons onto whoopee pie pans or cookie sheets. This will make 48 cookies.

Bake 12 minutes and transfer immediately to cooking racks.

For the filling put flour into medium saucepan and slowly add milk. Whisk until smooth. Turn to medium heat and cook stirring constantly with a whisk until very thick. Cool completely.

Mix together sugar, butter, shortening and vanilla in an electric mixer. Add flour mixture and whip until fluffy.

Spread onto cookie and top with another cookie. Continue until all cookies are done.

Store in refrigerator

.


Thursday, April 4, 2013

Carrot Cake Muddy Buddies

So many people loved when I made the birthday cake muddy buddies. I have been finding all sorts of different versions of the muddy buddies that I have been wanting to try. I saw this recipe for Carrot Cake muddy buddies and I thought it would be a fun snack to bring in to work after Easter. It has just taken me a little longer to make it. The recipe calls to use white chocolate as the binder but I decided to use the vanilla almond bark that I used for the birthday cake version. I don't know if these taste as much like carrot cake as the birthday cake version tasted like birthday cake. But they are still really good. The below recipe is for a single batch.

Carrot Cake Muddy Buddies

Adapted from Whats Cooking Love

5 cups rice Chex cereal
5 squares vanilla almond bark
1 1/2 cups carrot cake mix
1/2 cup powdered sugar

Mix the powdered sugar with the carrot cake mix in a plastic bag.

Put the Chex cereal in a large bowl.

Melt the almond bark according to the package directions. Pour melted almond bark over Chex cereal and combine well.

Pour cake mix over cereal and mix well.


Saturday, March 16, 2013

St. Patricks Day Cheese Ball

Phil and I are going to a St. Patrick's Day party tonight and I wanted something green to bring. I saw this recipe on Pinterest for a red velvet cheese ball and thought it sounded so good as I love everything red velvelt. The recipe called to use red vevlet cake mix in the cheese ball which is already red. So I decided to use french vanilla cake mix instead and put in some food coloring. I think it looks like a perfect St. Patrick's Day treat.

St. Patrick's Day Cheese Ball
Adapted from What Megan's Making

8 ounces cream cheese, at room temperature
1/2 cup butter, at room temperature
1 1/2 cups french vanilla cake mix
2 tablespoons brown sugar
1/2 cup powdered sugar
1/2-3/4 cup mini chocolate chips
Vanilla wafers for serving

In a stand mixer beat cream cheese and butter until smooth. Add in the cake mix, brown sugar and powdered sugar, beat until smooth. Transfer to a large piece of plastic wrap and wrap into a ball.

Refridgerate for 2 hours.

Place mini chocolate chips in a shallow dish.

Unwrap the cheese ball and roll in chocolate chips.

Place on a serving plate and serve with vanilla wafers.

This recipe is linked to: Foodie FridayShow and Tell SaturdayStrut Your Stuff Saturday,  Kitchen Fun with my 3 SonsWeekend PotluckFoodie Friday, Rediscovering Lost Arts From Our Mothers Mix it Up MondaysMelt in your Mouth Mondays,  On the Menu Monday,  Show me Your Plaid Mondays

Sunday, January 27, 2013

S'more Layer Cake

Cookbook Recipe # 34

Phil got me this cookbook for Christmas this year. I would highly recommend it if you are a cookbook lover like me. Deb Perelman is the author and she has a lot of unique recipes in this book. This S'more Layer cake being one of them. I saw this recipe when I was flipping through it and knew I had to make it. I was trying to figure out what excuse I would have to make it and then I thought, oh Phil's mom's birthday! So that is exactly what I did. Her birthday was today so Phil smoked ribs, which are her favorite and I made this cake.  Oh my gosh the cake was soooo good! The best part was the frosting. I got done making it and had a taste and it tasted like marshmallow fluff but way better. I was supposed to use a kitchen torch to brulee the frosting but I didn't realize that I did not have any butane. So I put it on broil in the oven instead. It still came out really good. Like a marshmallow over a fire. This was a pretty easy cake to make and very impressive!


S'more Layer Cake
Recipe from The Smitten Kitchen Cookbook by Deb Perelman

16 tablespoons butter, softened
2 cups all purpose flour
2 cups honey graham cracker crumbs
2 teaspoons baking powder
3/4 teaspoon baking soda
3/4 teaspoon salt
1/2 teaspoon ground cinnamon
2/3 cup granulated sugar
1 cup dark brown sugar
4 large eggs at room temperature
2 cups buttermilk

Filling:

225 grams milk chocolate
3/4 cup heavy cream
2 pinches of salt

Frosting:

4 large egg whites
1 cup sugar
1/4 teaspoon cream of tarter
1 teaspoon vanilla extract

Preheat oven to 350 degrees.

Butter two 9 inch round cake pans. Line with parchment paper, then coat with butter.

In a medium bowl mix together flour, graham cracker crumbs, baking powder, baking soda, salt and cinnamon. Set aside,

In a stand mixer mix butter, sugar and brown sugar until fluffy. Add eggs one at a time, scraping the bowl after each addition. Add a third of the dry mixture, then half of the buttermilk, a third of dry mixture, then rest of buttermilk, ending with dry mixture. Mix completely.

Divide batter between prepared cake pans.

Bake for 30 to 35 minutes, or until a toothpick comes out clean in the center.

Cool in pan on wire rack. Then invert onto rack, flip upright, and remove parchment paper. Cool completely.

Meanwhile, place chocolate in a heatproof bowl. Combine the heavy cream and salt in a small sauce pan. Bring to a simmer. Pour mixture over chocolate and let set for one minute. Stir to combine. Cool in refrigerator  stirring every once in a while until it is a spreadable consistency.

Once chocolate is ready, spread on one of the cakes. Then top with the other cake.

Fill a medium saucepan, part way with water and bring to a simmer

For the frosting, place egg whites, sugar and cream of tarter in a heat proof bowl. Place bowl over simmering water and whisk mixture until sugar is dissolved and egg whites are warm to the touch, about 3 minutes.

Transfer to a bowl of a stand mixture fitted with the whisk attachment. Whisk until glossy peaks form about 5 minutes.  Add vanilla and mix to combine.

Spread a thin layer of frosting on cake and then refrigerate cake for 10 minutes to set. Then generously finish frosting cake reserving some for the top. In a disposable piping bag, fill the rest of the frosting. Pipe dollops onto top of cake.

Set broiler to high.

Broil for about 5 minutes or so or until tops of frosting start to brown.

Serve and enjoy!

Print Page

This recipe is linked on:  Foodie FridayShow and Tell SaturdayStrut Your Stuff SaturdayFoodie FridayKitchen Fun with my 3 SonsWeekend Potluck Think Pink SundayChurch SupperCream of the CropSundae Scoop, Mix it Up MondaysMelt in your Mouth MondaysOn the Menu Monday,  Show me Your Plaid Mondays


Sunday, December 2, 2012

Dessert Shooters


We had our holiday party this weekend. I did a really cool, well I thought was really cool, dessert bar. I had a candy bar, and I did the Chai Latte Cupcakes that I posted previously and dessert shooters. I saw on Pinterest, the idea for a Christmas Candy bar. I already had some nice jars so I thought I would give it a whirl. It needed some sprucing up though so my friend Jane, also a Pinterest fan, saw some ideas for nice candy bar displays. Jane helped me make some really nice signs for the candy. I think it turned out really nice. Everyone thought it was really cool. The kids especially liked it.

Here is how it turned out:


I also got the idea for the dessert shooters on pinterest as well. I saw a few I liked but wasn't able to find many recipes for them so I kinda winged it. They came out soooo good! I did a s'mores dessert shooter and a strawberry shortcake dessert shooter. I think that throughout the week I am going to post some other good recipes that I made for the party. But for now here are the dessert shooter recipes.

S'more Dessert Shooter

Graham cracker crumbs
Marshmallow creme
Hershey's chocolate syrup
Whipped cream
Mini chocolate chips

Microwave the marshmallow creme until it is thinner, about 1 minute.

In a shot glass or dessert shooter, layer graham cracker crumbs, marshmallow creme, and chocolate syrup.

Top with whipped cream, then a few mini chocolate chips.

Strawberry Shortcake Dessert Shooter

Strawberries, diced
Whipped cream
Pound cake

Layer the strawberries, pound cake and whipped creme in a shot glass or dessert shooter. Top with whipped cream.


These recipes are linked on::Foodie FridayShow and Tell SaturdayStrut Your Stuff SaturdayFoodie FridayKitchen Fun with my 3 SonsWeekend Potluck Think Pink SundayChurch SupperCream of the CropSundae ScoopSugar and Slice Sunday Link Party Mix it Up MondaysMelt in your Mouth MondaysOn the Menu Monday,  Makin You Crave MondayOr So she SaysRecipe Sharing Monday


Thursday, November 8, 2012

Cherry Bars

Cookbook Recipe # 22

I was going through some of my cookbooks this last weekend looking for what recipes I am going to post for each one. I was looking though my community cookbooks. I am sure everyone has at least one of these at home. I tend to forget about these cookbooks I think because they do not have any pictures. I just love looking at the pictures in all my cookbooks. Although they do not have pictures, they should not be forgotten because the community cookbooks a lot of times have some of the best recipes there are. Recipes that have been passed down from generation to generation. Recipes that you know have been made over and over again by several family members.

When looking through some of my community cookbooks I found a recipe that I have been looking for, for a very long time: Cherry Bars. I remember several different people having these at parties. Mostly I remember my piano teacher Karla always having these bars after our piano recitals. I got so excited after the recital to get to have at least one of the cherry bars. I was so excited when I came across this recipe and knew I had to make them right away!

Cherry Bars
Hey Good Lookin' What's Cooking?


1 cup margarine
1 1/2 cups sugar
2 eggs
1 teaspoon vanilla
2 1/4 cups flour
1 1/4 teaspoon baking powder
1 can cherry pie filling
Powdered sugar


Preheat oven to 350 degrees.

In a stand mixer, combine margarine and sugar until well blended. Add remaining ingredients, except pie filling and mix well.

Pour half of batter in a greased 9 x 13 baking pan. Top with pie filling. Then top with remaining batter by spoonfuls over filling.

Bake for 35-40 minutes.

Top with powdered sugar.

Print Recipe

This recipe is linked on: Full Plate ThursdayLink it up ThursdayCreative ThursdayFantastic Thursday Wicked Good Wednesday Wednesday ExtravaganzaWhat's Cooking WednesdayCast Party WednesdayWhimsy Wednesday


Saturday, October 20, 2012

Pumpkin Cake Roll

I am all about pumpkin right now. I really love the flavor that it gives to desserts, or breakfast....as in the french toast a couple weeks ago. I decided to put it in a cake roll this time. Phil and I went over to his parents house for dinner last night and I said I would bring dessert. I have made a cake roll before but it wasn't near as good as this one. I tried a red velvet one a while ago.  It is kind of a scary dessert to make because the cake can easily crack in the rolling process. I learned last time that you do not want to let it rest to long because it starts to dry out and it will crack. I also put this one in the freezer over night and it just changed the way the cake came out. It was awesome. It was super moist and it held together really nice. Everyone loved it!

Pumpkin Cake Roll
Taste of Home

3 eggs, separated
1 cup sugar, divided
2/3 cup canned pumpkin
3/4 cup flour
1 teaspoon baking soda
1/2 teaspoon ground cinnamon
1/8 teaspoon salt

Filling:
1 8oz package cream cheese, softened
2 tablespoons butter, softened
1 cup confectioners sugar
3/4 teaspoon vanilla extract

Preheat oven to 375.

Line a 15 x 10 x 1 baking pan with waxed paper. Grease paper and set aside.

In a large bowl beat egg yolks on high until thick. Gradually add 1/2 cup sugar and pumpkin. Beat on high until sugar is almost dissolved.

In a separate bowl beat egg whites until soft peaks form. Gradually add remaining sugar and beat until stiff peaks form.

Combine flour, baking soda, cinnamon and salt. Gently fold into pumpkin mixture.

Spread into prepared pan.

Bake for 12-15 minutes until cake springs back.

Cool for 5 minutes.

Turn cake onto a kitchen towel dusted with confectioners sugar. Gently peal off wax paper. Roll up cake in the towel jelly roll style starting with short side. Cool completely.

In a small bowl beat the cream cheese, butter, confectioners sugar and vanilla until smooth.

Unroll cake and spread with filling evenly within 1/2 inch of edge. Roll up cake again.

Cover and freeze until firm.

Remove from freezer 15 minutes before cutting.

Print Recipe

This recipe is linked on:  Foodie Friends Friday,  Foodie Friday, Full Plate ThursdayLink it up ThursdayCreative ThursdayFantastic Thursday,Show and Tell SaturdayStrut Your Stuff SaturdayFoodie FridayKitchen Fun with my 3 SonsWeekend Potluck, Mix it Up MondaysMelt in your Mouth MondaysOn the Menu Monday,  Makin You Crave Monday Tempt My Tummy TuesdayTotally Tasty TuesdaysTasty Tuesday PartyTalent Show Tuesdays , Wednesday Extravaganza

Sunday, October 14, 2012

Halloween Poke Cake


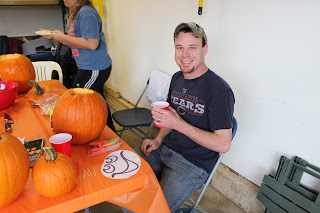
 Our friends Ryan and Sarah have a pumpkin carving party every year. Everyone brings a pumpkin to carve and a dish to pass. It is always a fun time.
Phil carved the pumpkin king and I carved a bat. The bat took a long time as it was very intricate. It is always cook to see how they turn out once you put the candles in them.


They look pretty good huh!


Here are some pictures of the fun:


Phil


Brian and his son Henry


Mark


Ryan


Cristy and Henry


Courtney and her daughter Callie, and Sarah and Ryan Son's Collin


This year I decided to try a Poke Cake. I remember having these in school but I think we called them Punch and Pour Cake. It was always one of my favorite desserts.

Poke cake is super easy to make and very versatile. You can use any kind of base cake mix and also interchange the types of jellos used for the inside as well. I used a marble cake and orange jello to make it like Halloween. I would't suggest the Frankenstein's for kids, they were super hard. The cake turned out really good. I love how moist the jello makes the cake and I like how the jello makes the cake look like its dripping. It is a fun festive cake that you could decorate for any occasion.

Halloween Poke Cake
Adapted from the Taste of Home


 1 (18 1/4oz) package fudge marble cake mix
2 (3oz) packages orange flavored gelatin
1 cup boiling water
1/2 cup water
1 can prepared chocolate frosting

Prepare cake according to package directions using a 9 x 13 baking pan.

Cool on a wire rack for 1 hour.

In a small bowl, dissolve gelatin in boiling water then stir in cold water.

With a skewer poke holes in cake about 2 inches apart in all directions.

Slowly pour gelatin over cake.

Refrigerate 2-3 hours.

Frost with prepared frosting. And decorate with sprinkles, candy corn, etc.

Keep in refrigerator until ready to eat.

Print Recipe

 Foodie FridayShow and Tell SaturdayStrut Your Stuff SaturdayFoodie FridayKitchen Fun with my 3 SonsWeekend PotluckSunday Link PartyThink Pink Sunday,Scrumptious SundaysChurch SupperCream of the CropSundae Scoop

Friday, October 5, 2012

Strawberry Cheesecake Shake

Cookbook Recipe #17

Bobby Flay is known for his burgers so it is kinda funny that I would choose to do a shake recipe out of his cookbook, but I LOVE shakes. Whenever we go for ice cream I almost always get a shake. One of my favorite shakes is from Coldstone....the Cheesecake Fantasy sundae made into a shake. So when I saw this shake recipe for a cheesecake shake I figured it would be a close bet. The recipe was originally for a blackberry shake, but I really like strawberry shakes so I decided to switch it up. This recipe was definitely the most prep work I have ever done for a shake, but the shake came out awesome. You have to make a fruit base and let it sit for a few hours to thicken up before you can make the actual shake. The fruit base is like a jam, so you can make any fruit that you want to mix in. The only thing is that you do a lot of work with not a lot of shake to go around. It was a great treat though!

Strawberry Cheesecake Shake
Adapted from Bobby Flay's Burgers, Fries and Shakes


Fresh Fruit Base

1 pound fresh fruit
4 tablespoons sugar
3 tablespoons strawberry jam
2 teaspoons lemon juice

Hull and slice strawberries into quarters.

Put sliced strawberries, 3 tablespoons sugar and 3 tablespoons jam in a saucepan and heat over medium high.

Mash strawberries with a potato masher and stir occasionally until the mixture thickens to a jam-like consistency, about 20 minutes.

Remove from heat and stir in lemon juice. Add the remaining tablespoon of sugar if needed.

Transfer to a bowl and cover with plastic wrap. Refrigerate for at least 2 hours or up to 24 hours.

Shake

1/3 cup fruit base
1/4 cup whole milk
3 ounces cream cheese
1 1/2 cups vanilla ice cream

Mix fruit base, milk and cream cheese in blender. Then add ice cream and blend until smooth.


Print Recipe

This recipe is linked on:  Foodie Friends Friday,  Foodie Friday, Full Plate ThursdayLink it up ThursdayCreative ThursdayFantastic Thursday,Show and Tell SaturdayStrut Your Stuff SaturdayFoodie FridayKitchen Fun with my 3 SonsWeekend Potluck

Friday, September 28, 2012

Cherry Crisp

Cookbook Recipe #16

For the past four years my mother-in-law Linda and I have gone to the Taste of Home Cooking Show. It is something that I look forward to every year. They cook around 8 recipes and then at the end of the show they draw names and whoever wins gets to take home the recipe and a nice piece of serveware . They also auction off a bunch of other prizes such as cookbooks and cookware. I really enjoy the Taste of Home recipes because they are all submitted by home cooks and then the test kitchen cooks them and decides which ones go in the magazines and cookbooks. So you always know they are going to turn out good. This year we upgraded our tickets to the VIP section, so not only did we get to sit in the
front, but we also got a free cookbook as well. I was really excited about this cookbook because I have been seeing it adverstised a lot. I have already marked several recipes to make in this book but I decided on the one to feature for this cookbook to be Cherry Crisp. Cherry crisp reminds me of eating school lunch because it was one of my favorite desserts that we got. Cherry crisp and when they put frosting in between two graham crackers. Those were the days!

This recipe was super easy. It is made in the microwave so dessert was ready in T minus 10 minutes...gotta love that!The only thing I would change for the next time I make this would be to use less sugar. I felt like it was a little too sweet. But other than that it was very close to the cherry crisp from my childhood days!

Cherry Crisp
Taste of Home Best Loved Recipes

1 21oz can cherry pie filling
3/4 cup packed brown sugar
2/3 cup quick cooking oats
1/3 cup all-purpose flour
1/4 cup butter, cubed

Spoon filling into a greased pie dish.

In a large bowl combine sugar, oats, and flour until well combined.

Cut in butter with a pastry blender until crumbly. Sprinkle over filling.

Microwave for 8 minutes.

Print Recipe

This recipe is linked on: Foodie Friends Friday,  Foodie Friday, Full Plate ThursdayTastetastic ThursdayLink it up ThursdayThriving on ThursdaysCreative ThursdayFantastic Thursday


Saturday, September 22, 2012

Spiced Apple Cake

I have a hard time trying to follow the food seasons. I tend to just make whatever sounds good to me. I want to try to start using ingredients when they are at their peak. Right now apples are at their peak and I have a ton of Honeycrisp (the best apple their is in my opinion) in my fridge. So, I am trying to come up with different things I can make with the apples. For a few years now I have saved and marked several recipes for apple cakes. I always pull out recipes for the apple cakes to make but never get around to doing so. Well  by golly this weekend I finally made it!

Phil's cousin was in town from Philly and the family was getting together to see him. I thought since I have so many apples I would finally make an apple cake. I mixed the Honeycrisp with Granny Smith in the cake. I feel like you always have to have some Granny Smith when baking otherwise the apples tend to taste bland. The recipe said to leave the cake in the bundt pan for 15 minutes before flipping it out onto a cooling rack to cool. Well 15 minutes is not long enough. A side of the cake crumbles apart when trying to flip because I think it was still to moist. Only good thing about this was that I got to try a taste before everyone tried it. So I would suggest leaving it in the pan at least 30 minutes before inverting it out. The cake still tasted great all the same, everyone said how good it was!

Spiced Apple Cake
Adapted from Giada De Laurentis

4 medium apples (I used 2 Granny Smith and 2 Honeycrisp) cored, peeled and sliced
1 1/2 cups maple syrup
3 eggs, at room temperature
3/4 cup brown sugar
2/4 cup vegetable oil
1 tablespoon vanilla
3 cups flour
1 1/2 teaspoons baking powder
1 1/2 teaspoons baking soda
1 tablespoon cinnamon
1/2 teaspoon ground nutmeg
1/2 teaspoon ginger
1/2 teaspoon salt

Icing:

3 cups powdered sugar
6 tablespoons cream cheese, softened
6 tablespoons milk

Preheat oven to 350 degrees. 

Liberally butter and flour a 10 inch bundt pan.

In a large bowl mix together the apples, maple syrup, sugar, eggs, oil, and vanilla. 

In another bowl mix together flour, baking powder, baking soda, cinnamon, nutmeg, ginger, and salt. 

Mix the dry ingredients into the apple mixture. Pour into the prepared pan and bake until a toothpick comes out clean, about 55 to 60 minutes.

Let cool in pan 30 minutes. Then invert onto a cooling rack and cool an hour. 

Print Recipe


This is what I use to peel apples and it is amazing. I would cut my fingers to shreds trying to peel apples the traditional way. I would suggest this to anyone who bakes a lot with apples:


This recipe is linked on: Show and Tell SaturdayStrut Your Stuff SaturdayFoodie FridayFoodie Friends Friday


Monday, September 17, 2012

Apple Crisp

I absolutely love fall. It is my favorite season for sure. The changing of the leaves, the crisp air, the fall candle scents, apples, pumpkins, cozy feeling, more soups! I cook comfort food all year but it always tastes so much better in the fall for some reason. I grew up going apple picking every year with my family. We would go for the afternoon and fill up a couple of bags of apples and always get apple cider and cherry cider. I looked forward to doing so every year. This year I was looking online for places to go apple picking close by our house and so many of the orchards are not even opening this year because of the weather this spring.

One of my favorite kinds of apples is the honeycrisp apple. They have so much flavor, they are unbelievably good! I load up on honeycrisp apples in the fall all of the time because I know they are out for only a short time. Phil loves my apple crisp that I make so I also made this for him last night. So I decided to post it tonight because it was too good to wait to post until I made it again.

I mixed granny smith apples and honeycrisp apples to make this apple crisp. This is the only recipe for apple crisp that calls for using cake mix for the topping. I really like the flavor the cake mix brings to this apple crisp. YUUUMM!!

Apple Crisp
Adapted from the Taste of Home

7 medium tart apples, peeled and thinly sliced
1 cup sugar
1 tablespoon flour
1 teaspoon cinnamon
Dash salt
1/4 cup water
1 9oz package yellow cake mix
3/4 cup quick cooking oats
1/3 cup butter, softened
1/4 cup brown sugar
1/4 teaspoon baking powder
1/4 teaspoon baking soda

Preheat oven to 350 degrees.

Place apples in a greased 2 1/2 quart baking dish.

In a small bowl mix sugar, flour, cinnamon, and salt. Sprinkle over apples. Drizzle with water.

In a large bowl combine cake mix, oats, butter, brown sugar, baking powder and baking soda. Sprinkle over apples.

Bake uncovered for 45-50 minutes.


Print Recipe

This recipe is linked on: Mix it Up MondaysMelt in your Mouth MondaysMust Try MondayOn the Menu MondayMouth Watering MondayMakin You Crave Monday

Wednesday, September 12, 2012

Indoor S'more Sundaes

As you all know my husband Phil is away on a fishing trip this week so I did a girls night with Phil's aunt Cindy and her daughter Katelyn. Cindy's husband Ken is one of the guys who is completely obsessed with the fishing trip. He was like a kid on Christmas morning the night before they left for their trip, he was so excited about fishing!

For dinner I made Jambalaya ( which I will post another time), a spinach salad, and dessert of the Indoor S'more Sundaes. The s'more sundaes are one of my favorite desserts to make for guests because it can be made in advance. I always feel so bad when I have guests and I am in the kitchen making dessert for a long time after dinner. This is a super easy recipe and I think it is impressive to. It looks much fancier than it is to make, which is always nice when you have guests because it makes you look like you really know what you are doing.

I was really apprehensive the first time I ever made these because putting ice cream in the oven sounds like a messy idea to me. But it is in the oven only long enough to make the marshmallows ooey gooey and scrumptious. The only thing I changed about the original recipe was that I just used Hersey's chocolate syrup instead of making it homemade. I absolutely love this recipe, can you tell?!?!

Indoor S'more Sundae's
Adapted from Melissa D'Arabian

Graham Cracker Crust:

3/4 cup graham cracker crumbs
3 tablespoons butter, melted
2 tablespoons sugar
1/2 teaspoon cinnamon
Salt

4 scoops vanilla ice cream
1 1/2 cups mini marshmallows
Hersey's chocolate syrup

In a large bowl mic the graham cracker crumbs, butter, sugar, cinnamon and a sprinkle of sat.

Firmly press the crust into muffin tins to make individual crusts.

Top each crust with a scoop of vanilla ice cream.

Press the mini marshmallows into the ice cream, covering the scoop completely. You will have 4 s'more cups.

Freeze at least 1 hour.

Preheat broiler on low.

Place s'more cups under broiler for 30 seconds to a couple minutes, depending on your oven, until the marshmallows start to brown.

Top with chocolate sauce.

Print Recipe

This recipe is linked on: What's Cooking WednesdayCast Party WednesdayWhimsy WednesdayThriving on ThursdayTastetastic ThursdayFull Plate Thursday


Wednesday, September 5, 2012

Chai Latte Cupcakes

My General Managers last day is tomorrow because he is being promoted. He is a big fan of Starbuck's Chai Tea Latte's. We always know when he has had one as he gets overly talkative and seems very jittery. It is really funny! So I thought what would be more appropriate for his last day then to make Chai Latte Cupcakes.

I saw Starbucks flavored cupcakes first on Kimz Kitchen. I got the idea from her blog to make the cupcakes look like a Starbucks Frappacino's. I bought just white paper cups and trimmed them down to the size of the cupcakes. Then I found the Starbucks logo online and cut them out and pasted them on the cups. I stopped by Starbucks and asked if I could have several of their straws and trimmed them down to go on the top. I definitely can say it is the most visually creative thing I have ever made!

I have a knack for making a big mess in the kitchen for sure. I had frosting everywhere! I definitely have not figured out the trick to piping frosting out of a cake decorating bag, as I think I had more all over my hands and counter then I did on the actual cupcakes. Oh well, I am still pretty proud of myself!

Chai Latte Cupcakes
Adapted from Kimz Kitchen and Betty Crocker

Cupcakes:

1 box Betty Crocker SuperMoist French Vanilla cake Mix
( water, eggs and vegetable oil called for on cake mix box)
1 1/2 (1oz) packages instant chai tea latte mix

Frosting:

1 cup white vanilla baking chips
1 container Betty Crocker Rich and Creamy White Frosting
Ground Cinnamon

Heat oven to 325 degrees (for nonstick).

Place paper cupcake liners in each of 24 regular size muffin cups.

Make and bake cake mix as directed on the box for 24 cupcakes.

Cool completely for 30 minutes.

In a microwavable bowl melt baking chips for 30 seconds. Repeat, if necessary until chips are melted. Cool 5 minutes. Stir in frosting until well combined.

Frost immediately.

Top with cinnamon.

Print Recipe

This recipe is linked on: What's Cooking WednesdayCast Party WednesdayWhimsy WednesdayFantastic ThursdayCreative ThursdayThriving on ThursdayLink it Up ThursdayTastetastic ThursdayFull Plate Thursday


Wednesday, August 29, 2012

Cinnamon Roll Cake

Today was my boss and my coworkers birthday. So I decided to make a cinnamon roll cake recipe that I have seen now on several blogs and Pinterest. I thought it would be a good breakfast cake because you have cinnamon roll's for breakfast. It tasted just like a cinnamon roll. It was awesome! I only had a couple pieces left which I snatched up for Phil to have a taste.

I liked this recipe because I got all the goodness of a cinnamon roll without all the waiting around for the dough to rise, then the rolls to rise.

I love that with this blog I can make all the desserts I have been wanting to make and not have to leave it on my counter at home to eat because I can just bring it in to work to get eaten by everyone else!

Cinnamon Roll Cake
Adapted from Chef in Training

3 cups flour
1/4 teaspoon salt
1 cup sugar
1 1/2 cups milk
2 eggs
2 teaspoons vanilla
1/2 cup butter, melted

Topping:

1 cup butter, softened
1 cup brown sugar
2 tablespoons flour
1 tablespoon cinnamon

Glaze:

2 cups powdered sugar
5 tablespoons milk
2 teaspoons vanilla

Preheat oven to 350 degrees.

Spray and 9 x 13 glass baking pan with cooking spray.

In a stand mixer add flour, salt, sugar, baking powder, milk, eggs and vanilla. Mix well. Add butter on low and mix well.

Pour mixture into baking pan.

In a medium bowl mix together topping ingredients. Using a cookie dough scoop, or tablespoon, drop mixture evenly over batter in pan. Using a knife to marble the mixture through the cake.
Show and Tell Saturday
Bake for 35-40 minutes or until a toothpick comes out clean when inserted in the center.

For the glaze mix together sugar, milk and vanilla with a whisk. Pour evenly over warm cake.

Serve warm or at room temperature.

Print Recipe

This Recipe is Linked up on: Foodie FridayFriday FavoritesFoodie FridayStrut Your Stuff SaturdaySweet Treats SaturdaySweet Saturday

Monday, August 6, 2012

Mini Pina Colada Bundt Cakes

I  pulled a Paula Deen when making this recipe as it calls for 2 cups of butter. Sometimes you just have to go with it though. A lot of desserts would not taste like dessert if it wasn't for the butter!

My coworker is coming back from maternity leave tomorrow after 3 months so I wanted to bring in a treat for the occasion. I found this recipe for the Pina Colada Bundt Cakes on the Live Love Pasta blog. When I saw this post I immediately printed out the recipe. I love Pina Coladas. I am a fufu drink girl, so when I order a drink it is usually a Pina Colada or a strawberry daiquiri. So I figured these cakes have to be good!

They cakes came out pretty good. I will definitely make them again but I think I would add more pineapple to the batter. They came out really well for a first try though.....I have never called myself a baker by any stretch so when desserts come out of the oven not burnt to a crisp I am happy!

Mini Pina Colada Bundt Cakes
Recipe from Live Love Pasta

For the Cake:

1 cup butter, softened
11/2 cups sugar
2 eggs, lightly beaten
2 egg whites
2 teaspoons vanilla
2 2/3 cups all purpose flour
1 teaspoon baking powder
1 cup crushed pineapple, undrained

For the Glaze:

3 cups confectioners' sugar
5 tablespoons milk
3 tablespoons Malibu Rum

Shredded coconut for garnish

Preheat oven to 350 degrees. Grease and flour a mini bundt pan.

Using a stand mixer with the paddle attachment, cream butter and sugar together. Add eggs, egg whites and vanilla and mix until well combined.

In a medium bowl mix together flour and baking powder. Add this mixture to stand mixer gradually and combine. Add in crushed pineapple.

Pour batter into mini bundt pan. Bake for 20 minutes until golden brown.

Cool for 10 minutes before removing from pan. Then transfer for a wire cooling rack.

In a small bowl mix confectioners sugar, rum and milk until smooth. Dip tops of cakes in glaze and top with coconut if desired.

Thursday, July 26, 2012

S'more Bars


When I think of summer I think of S'mores and fried chicken....but for today I am just going to talk about S'mores.  I like how you can find so many different recipes for desserts that taste like S'mores. I have seen recipes for cakes, ice cream treats, bars, trifles...etc.  Some of my best memories involve S'mores. On one of our first dates Phil surprised me by taking me to my first drive-in movie. I had told him that going to the drive-in was on my "bucket list." He brought along this S'more maker that he had, that you can make S'mores indoors on a little sterno. We sat outside of the car in lawn chairs and made S'mores and watched the movie. It was such a fun a memorable night for me! 

So when I saw these S'more bars on Pinterest recently I knew I had to make them soon. I got the recipe off of the blog Country Cleaver. Her version said to cook the marshmallows on the stove, but when I made Rice Krispie Treats growing up I always melted the marshmallows in the microwave. I would much rather try to get gooey marshmallow off of a bowl than a a saucepan.

S'more Bars
Adapted from The Country Cleaver

1 10oz bag Mini Marshmallows
11/4 cups semi-sweet chocolate chips, divided
1 12oz box Golden Grahams Cereal
6 tablespoons butter
1/2 teaspoon vanilla
Non-stick cooking spray

Spray a 9x9 baking pan with cooking spray.

In a large microwavable bowl melt 6 tablespoons butter and mini marshmallows. I cooked it for 45 seconds, stirring after every 10 seconds. 

Stir butter and marshmallows until gooey and thick. Add in Golden Grahams and 1 cup chocolate chips. Mix well. 

Pour into baking pan. Top with 1/4 cup chocolate chips. Press down to make them more compacted. 

Allow to sit at least 30 minutes before cutting to be sure they are cooled.