Saturday, August 31, 2013

Spinach Dip Pull Apart Bread


I was looking for a fun appetizer to take to a friends house last weekend and was really wanting a spinach dip type recipe. I have been wanting to make a sourdough bread pull recipe for awhile now and decided I would mix the two. I didn't find any recipes for the spinach dip sourdough bread pulls so I just kind of winged it with a recipe I found from Pillsbury. It came out soooo good. It was gone really fast and everyone said how good it was. I think I will be making the bread pulls in many different flavors. It is such a pretty dish to bring somewhere. I saw a recipe for a cinnamon roll one...I think that will be my next one!

Spinach Dip Pull Apart Bread
Adapted from Pillsbury 

1 loaf sourdough bread
1 stick butter, melted
1 9oz box frozen chopped spinach, thawed and squeezed dry
8oz block mozzarella cheese, cut into thin slices
1/4 cup Parmesan cheese
1 8oz package cream cheese, softened
1/4 cup mayonnaise
1 1/2 teaspoons garlic salt
Pepper

Preheat oven to 350 degrees.

Cut sourghdough bread in both directions, but taking care not to cut all the way through.

Stuff mozzarella cheese slices in all the cuts in the bread.

In a large bowl in mix spinach, parmesan cheese, cream cheese, mayonnaise, garlic salt and pepper. Spoon into cuts in the bread.

Pour melted butter all over bread.

Wrap bread in foil and bake for 15 minutes. Unwrap and bake an additional 10 minutes.


Saturday, August 24, 2013

Southern Fried Chicken

Cookbook Recipe #62 

I feel like this blog helps me to make things that I have always said I would make one day. Homemade fried chicken is one of those things. I see so many recipes for real fried chicken and I always think I shouldn't make that cause

we are trying to eat better or that it looks sooo messy. I decided to through all those thoughts out the window and go for it. I thought this cookbook would have the perfect recipe to because it is a cast iron cookbook. Whenever you see people cooking fried chicken it is always in some 100 year old cast iron skillet. My cast iron skillet is not a 100 years old but it does this trick. I have to start seasoning it. Let me tell you this was a great recipe to season it!

The chicken came out good, not as good as I was hoping. I missed the step of seasoning the buttermilk in the recipe (I included that step in the bottom). I make oven fried chicken a lot and I never season the buttermilk so I didn't really look at that part of the recipe very well when I was doing it. That is one thing I still really need to learn. I need to read the entire recipe a day before I am going to make it. This was not messy at all to make. I was quite surprised. And very easy. Next time though I think I am going to try to brine the chicken instead of soaking in buttermilk. I think that will bring out the seasoning even more.

Southern Fried Chicken
Adapted from Cast Iron Cookbook by Joanna Pruess

1 whole chicken cut up into 8 pieces
2 cups buttermilk
2 tablespoons Tabasco
2 teaspoons salt
2 teaspoons dried tarragon, thyme, and garlic powder
2 cups flour
1 tablespoon paprika
1 tablespoon salt,
Pepper
1/8 teaspoon cayenne pepper
Vegetable oil for frying

In a large resealable plastic bag combine chicken, buttermilk, Tabasco, salt, garlic powder, tarragon and thyme. Refrigerate overnight or for at least 8 hours. Turning the bag occasionally.

Turn oven on the 200 degrees. Put a wire rack on a baking sheet. Set aside.

Combine the flour, 1 tablespoon paprika, 1 tablespoon salt, pepper, and 1/8 teaspoon cayenne pepper in a large shallow dish.

Drain chicken in a colander.

In a large cast iron skillet fill with oil about 1/2 inch deep and heat until hot. When a little flour sprinkled in the oil foams, the the oil hot enough.

Toss chicken pieces in the seasoned flour, patting to remove excess. Gradually add to skillet, do not crown the pan. Add dark pieces first. Cook until golden brown about 10 minutes and then turn and cook other side until golden, 8 to 10 minutes. Transfer chicken pieces baking sheet and put in oven while finishing the rest of the chicken.


Saturday, August 17, 2013

Boston Baked Beans Brennan

Cookbook Recipe #61

I got this cookbook while Phil and I were on a trip to Vegas. We decided to take a day trip to go see the Grand Canyon as neither of us had ever been there. We took a tour bus there as we did not have a car on the trip and on the way they stopped at a restaurant and gift shop for a lunch. In the gift shop they had this cookbook. I always like to try to find a cookbook while I am on vacation as I like to bring home some of the local flavors. I thought this book was perfect for the west. It is chalk full of home cooked cowboy favorites and stories of the wild west.

My Dad and brother Daniel were visiting last weekend and I decided to make a ham and wanted a fun side to go with it. I knew we did not have plans for Sunday so I thought I would finally be able to make from scratch baked beans. They take a long time in the oven so it is hard to do unless you are home all day. They were super easy to make and came out great. I made some additions to the recipe as I like my beans sweet. I added some ketchup and brown sugar. I would probably add even more next time as I would have liked them a little sweeter. Sorry for the picture, I completely forgot to take the picture while they were still in the pot so I had to take leftovers to take this pic.

Boston Baked Beans Brennan
Adapted from The All American Cowboy Cookbook

1 pound dry Great Northern Beans, soaked overnight
1/2 teaspoon baking soda
4 slices bacon, cut into small pieces
1/3 cup molasses
1 teaspoon mustard
1 teaspoon garlic powder
1 teaspoon onion powder
1 1/2 teaspoons salt
1/4 teaspoon pepper
3 tablespoons brown sugar
1/2 cup ketchup

Preheat oven to 300 degrees.

Cook beans in water with baking soda for 10 minutes over medium low heat. Drain and rinse.

In a large dutch oven mix beans, bacon, molasses, mustard, garlic powder, salt and pepper.

Add enough water to barely cover the beans. Bake for 6 hours.

Checking every hour or 2 and adding more water if necessary.

With one hour remaining add the brown sugar and ketchup. Mix well and finish baking.


Saturday, August 10, 2013

Baked Potato Soup

Cookbook Recipe #60

This is a really good Southern Living Cookbook because it has a lot of pictures which I really like when I am looking through cookbooks. The Southern Living Annual Recipe books do not have very many pictures in them. Although those are some of my favorite books. A lot of times though when I see a picture of a recipe I want to make it more then when there is not a picture. I am assuming this is most people though!

I was having a craving for a baked potato soup. I knew I needed to find a cookbook recipe for the week so I was pouring through all my cookbooks to find a baked potato soup recipe. Since I have used most of my soup cookbooks already it took me a bit to find one, but I found one in this cookbook. I love this soup because it is so quick to make, well depending on how you do the potatoes. The potatoes are supposed to be baked, I didn't want to wait over an hour to bake potatoes so I just cooked them in the microwave. So should I call the recipe Microwave Potato Soup?

I cut this recipe in half because it seemed like it was going to make way to much. Another change I made was I swapped out buttermilk for milk. I had some buttermilk in the fridge that was going to go bad soon so I thought it would be a good addition. I also added sour cream. Gotta have sour cream with baked potato soup. This is one of my favorite soups now. I know I have made one before on here, but I didn't like the picture that came out with it. This one looks much more appetizing!

Baked Potato Soup
Adapted from Southern Living Cookbook

4 medium russet potatoes, baked or microwaved
2 tablespoons butter
1/6 cup flour
2 cups fat free half and half
1 1/2 cups buttermilk
Salt
Pepper
1/2 cup fat free sour cream
1 cup shredded cheddar cheese
5 slices bacon, cooked and crumbled


Peel potatoes and mash with a fork. Set aside.

Melt butter in a large dutch oven over medium heat. Add flour and stir until smooth.

Stir in potatoes, half and half, buttermilk, sour cream, salt, pepper, and most of the bacon.

Cook over low heat until thick and smooth.

Top each serving with cheese and bacon.


Friday, August 2, 2013

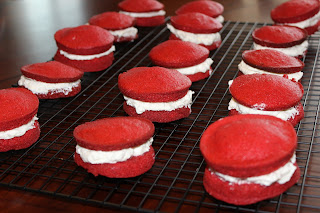
Red Velvet Whoopee Pies

Cookbook Recipe #59

I have been wanting to make whoopee pies for awhile now. I bought whoopee pie pans last year with the intention of making them. Yeeaaa it never happened. Phil and I were going over to a friends house last weekend and I was looking for something to make for dessert that didn't have to go in the oven or stay frozen because we had to travel a bit. I thought, I will finally make whoopee pies. I came across these red velvet whoopee pies in Paula Deen's cookbook. I love anything red velvet so I thought they would be perfect. I had never had a whoopee pie so I didn't know what they were supposed to taste like. They came out pretty good. I thought the cream filling would be sweeter then it was, but they were still good. They were a lot easier then I thought as well, which is always nice for a dessert.

Cousin Johnnie's Red Velvet Whoopee Pies
Recipe from The Deen Family Cookbook by Paula Deen

Pies

3 cups flour
1 teaspoon baking soda
2 teaspoons cocoa powder
1 1/2 cups canola oil
1 teaspoon white vinegar
One 1 ounce bottle red food coloring
1/2 teaspoon vanilla
1 1/2 cups sugar
2 eggs
1 cup buttermilk

Filling

5 tablespoons all purpose flour
1 cup milk
1 cup sugar
8 tablespoons butter, softened
1/2 cup solid vegetable shortening
1 teaspoon vanilla

Preheat oven to 350 degrees.

Lightly grease whoopee pie pans, or cookie sheet.

Sift flour, baking soda, and cocoa together.

In another bowl combine oil, vinegar, food coloring and vanilla.

In an electric mixer beat the sugar and eggs together until they turn pale and double in volume. Add the oil mixture and mix to combine. Add the flour mixture and buttermilk alternately in five small additions, starting and ending with flour.

Drop the batter by tablespoons onto whoopee pie pans or cookie sheets. This will make 48 cookies.

Bake 12 minutes and transfer immediately to cooking racks.

For the filling put flour into medium saucepan and slowly add milk. Whisk until smooth. Turn to medium heat and cook stirring constantly with a whisk until very thick. Cool completely.

Mix together sugar, butter, shortening and vanilla in an electric mixer. Add flour mixture and whip until fluffy.

Spread onto cookie and top with another cookie. Continue until all cookies are done.

Store in refrigerator

.


Saturday, July 27, 2013

Double Streusel Blueberry Coffee Cake

Cookbook recipe #58


You know those recipes where as you are making them they look all wrong the whole time, then they come out great? This is one of those recipes. I have never made a coffee cake before so I did not know what to expect. The dough in the recipe gets really really thick and seems all wrong as your making it. But it came out really good so sometimes I have learned to just go with it and wait and see if it comes out. This time my instinct was right. The only thing I changed about the recipe was that I added blueberries. They are still on sale for good prices here so I had some in the fridge I needed to use up. This recipe was super easy as you just use Bisquick baking mix. It literally took no time at all to make. My kind of baking!

Double Streusel Blueberry Coffee Cake
Adapted from Best of Betty Crocker 2010

Streusel 

2/3 cup Original Bisquick mix
2/3 cup packed brown sugar
1 teaspoon ground cinnamon
3 tablespoons cold butter

Coffee Cake

2 cups original Bisquick mix
1/2 cup milk
2 tablespoons sugar
1 1/2 teaspoons pure vanilla extract
1 egg
1 cup fresh blueberries

Preheat oven to 375 degrees.

Spray and 9 inch round cake pan with cooking spray.

Make the streusel in a small bowl by mixing all but the butter. Then cut in the butter with a pastry blender until crumbly. Set aside. 

Next mix all the ingredients for the coffee cake in a large bowl. 

Spread half of batter in pan. Then top with half the blueberries. Then top with half of the struesel. Then repeat with the rest. 

Bake for 20-25 minutes or until golden brown. Let stand 30 minutes before serving.


Saturday, July 20, 2013

Country Fried Steak


Cookbook Recipe #57

Country Fried Steak is probably in my top five favorite dishes. For some reason you do not see it on menus very many places around here in Illinois. Not sure why. It was everywhere on menus in Iowa where I grew up. I ordered it all the time.

I found this recipe in the Cooking Light Comfort Food Cookbook. This is a great cookbook! I am always trying to find lighter versions of my favorites. As many of you know, I love comfort food. So if I can find a less caloric version, I want to try it. I have always liked recipes from Cooking Light. Most times they do not taste like you are using lighter ingredients. So I thought this recipe would be great as well.

As much as I love this dish you would think I would have this great recipe for it that I have mastered and make all the time, right? Well that is not the case. I have tried several recipes and every time I do something to sabotage it. Usually I over cook it. This recipe seemed easy enough and yet I still overcooked it. I think I am always afraid of under cooking so I overcooked. I am sure if I followed this recipe time it would have came out fine, but I left it on a little longer than I should have. It was still good, but not the same. So if you make this recipe, follow the time exactly! The gravy was really good, although my Mom would not approve...(sssshhh, it was from a package)! The recipe called to use a mushroom gravy because it it from Cooking Light. I was okay with making the steak part light, but the gravy...no way. Hopefully if you guys make this it turns out better for you!

Country Fried Steak
Adapted from Cooking Light Comfort Food

3 tablespoons fat free milk
2 large egg whites
1/3 cup flour
1/2 teaspoon onion powder
1/4 teaspoon garlic powder
1/2 teaspoon salt
1/4 teaspoon black pepper
4 sirloin cubed steaks
2 teaspoons vegetable oil

1 package country style gravy

Combine milk and egg whites in a shallow dish with a whisk.

In another shallow dish combine flour, onion powder, garlic powder, salt, and pepper.

Starting with one steak dip in egg mixture, then flour mixture. Repeat with the rest of the steaks.

Heat oil in a large skillet over medium high heat. Cook steaks 3 minutes on each side or until browned.

Remove steaks from pan and keep warm.

Make gravy according to package directions.

Serve over steaks.


Tuesday, July 16, 2013

BBQ Chicken with Bacon and Cheese

This was the first dish I made my husband Phil when we were dating. It is a copycat recipe of Chili's Monterrey Chicken. Although of course I do not put on the green onions. Phil must have liked it the first time because we are married now! Funny thing though, I do not believe I have made this again until tonight, which has been 8 years. I honestly don't know why now, because I really like it. I think because I have gotten so into cooking over the years that I just wanted to try new things all the time. So it was fun to make this again tonight. I added a twist too it this time though. I added a chili lime seasoning that I had in my spice cabinet. I don't think I will add that again. It gave it a smokey flavor and I really like the sweet flavor that it normally has. It was not bad, just not the same.

BBQ Chicken with Bacon and Cheese
Adapted from Chili's

2 boneless skinless chicken breasts
4 slices of bacon, cooked
Chili lime seasoning (optional)
Shredded cheddar cheese
Your favorite BBQ Sauce

Preheat grill over medium heat for direct cooking.

Season chicken breasts with chili lime seasoning.

Grill 9 minutes a side over direct heat, or until chicken is no longer pink.

Brush with bbq sauce. Top with bacon and then shredded cheese.

Grill just long enough to melt the cheese.


Saturday, July 13, 2013

Blueberry Streusel Muffins

Cookbook Recipe #56

Blueberries are on sale big time around here. I always buy a big container of blueberries when they are a good price. The container was so big though I didn't know what I was going to do with all of them. I thought what better to make then blueberry muffins. I have always like blueberry muffins with a crumbly topping on them so I was in search for a good blueberry streusel muffin when I came across this one in one of my Barefoot Contessa cookbooks.

I learned a great tip from Ina Garten about making muffins. Use an ice cream scoop. It is the perfect size to fill the muffin tins and they all come out the exact same. What a great idea right? I use the kind of ice cream scoop that reminds me of the cooks in the lunch line in school. You know, the scoop they used for mashed potatoes? That style works perfect for this.

The muffins came out pretty good. I still have not conquered baking. I can make great desserts, but cookies and muffins just do not seem to be my forte. Phil said they were really good. Maybe I am just too critical of myself.

Blueberry Streusel Muffins
Barefoot Contessa Back to Basics by Ina Garten

3 1/2 cups flour
1 1/2 cups sugar
4 1/2 teaspoons baking powder
1 teaspoon baking soda
1 teaspoon kosher salt
2 cups buttermilk, shaken
1 stick butter, melted and cooled
1 1/2 teaspoons grated lemon zest
2 large eggs
2 cups fresh blueberries

Streusel

3/4 cup flour
1/2 cup light brown sugar
1 teaspoon ground cinnamon
1/4 teaspoon kosher salt
4 tablespoons cold butter, diced

Preheat oven to 375 degrees.

Line muffin tins with paper.

Into a large bowl sift the flour, sugar, baking powder,baking soda, and salt.

In another bowl mix buttermilk, butter, lemon zest and eggs.

Mix the wet mixture into the dry mixture with a fork. Fold the blueberries into the batter.

Using an ice cream scoop, scoop the batter into the muffin tins.

For the streusel, place all ingredients into a bowl and using a hand blender cut the butter into the dry ingredients until it is in very small pieces.

Spoon about 1 tablespoon of streusel on top of the muffins.

Bake for 20 to 25 minutes.


Saturday, July 6, 2013

Sizzling Rice Soup

Cookbook Recipe #55


I know another soup recipe, in the summer nonetheless. I just love it so much and when I look through my cookbooks they are always the recipes I want to make in them. This soup reminds me of my childhood. It has been a favorite of mine for years. It is one of the first soups I remember eating. There used to be a Chinese restaurant called the Imperial Palace that my family always went to in Omaha. I used to love going there because there were Koi ponds and rivers with Koi running through the restaurant. I always thought it was so cool. They also had Sizzling Rice Soup and we always got it. The waiter would bring the bowl of soup to the table with the squares of sizzling rice. Then he would drop the rice in and it would sizzle really loud. I loved it. Although there was never enough of the rice for me. It was the best part of the soup. I could have eaten all the rice meant for 4 by myself. Ever since getting the soup at the Imperial Palace I look for it on every Chinese menu. And if they have it I always get it.

I was going through this Oriental Cookbook the other day and came across the soup and it sounded so easy. So I decided to give it a whirl. The soup came out really good, minus one thing. No sizzle. It did say that you must work quickly and put the rice in the soup right away to maintain desired sizzle. I did not work very quickly so I am sure this is why. Oh well. Other than the sizzle the soup tasted very similar to soup at Chinese restaurants. I made a few minor adjustments to the recipe. I did not put any meat in, but you certainly could put about anything in. I also changed up the vegetables that I added as well. It is a very versatile soup. I just love that sizzling rice!

Sizzling Rice Soup
Adapted From Better Homes and Gardens Oriental Cooking

1/4 cup short grain rice
2 cups snow peas
5 cups chicken broth
3 tablespoons soy sauce
Salt
Pepper
8 oz sliced mushrooms
1 cup sliced bamboo shoots
Oil for deep fat frying


Cook rice according to package directions. Cool. Divide rice into eight portions and form into patties.

Heat oil over 375 (I used a deep fat fryer).

Fry patties four at a time for about 4 minutes or until golden.

Meanwhile, cook mushrooms in a pan over medium heat until done.

In a large pot heat up chicken broth, soy sauce, salt, pepper, bamboo shoots, and snow peas. Add cooked mushrooms. Keep warm.

Working quickly place all the fried rice patties in a large serving bowl and pour soup over top. (Speed is important to obtain the desired sizzling, (I did not do this)).


Saturday, June 29, 2013

Matzo Ball Soup

Cookbook Recipe #54

We have a Jewish Deli close by my work that we like to go to a lot. My boss is Jewish so he got us into the Jewish deli. They have the best sandwiches hands down. There is a deli in Chicago called the Eleven City Diner. I think that is the best Jewish Deli that I have been to. Their pastrami is AMAZING! I also always get Matzo Ball Soup when I go to a Jewish Deli. I know a lot of people are not a fan of the matzo balls, but I really like them. I had my first bowl of Matzo Ball Soup at DZ Atkins Jewish Deli in San Diego. That place was really good. They put noodles in their soup which is why I put them in the soup I made. Although you cannot really see them in the picture! The only thing with this matzo ball recipe is that it does not make a whole lot. I doubled the recipe and it still was not a lot. It was enough for me and another meal but that is about it. If you have never been to a Jewish Deli, I definitely recommend it.

Matzo Ball Soup
Adapted from Better Homes and Gardens Soups and Stews

4 eggs
1 cup matzo meal
1/2 cup club soda
4 tablespoons vegetable oil
1 teaspoon salt

4 cups chicken stock
2 cups water
2 tablespoons chicken soup base
1 teaspoon poultry seasoning
1 teaspoon celery salt
Salt
Pepper
1/2 package fine egg noodles
2 carrots, peeled and diced

Beat eggs well and stir in matzo meal, club soda, vegetable oil and salt. Mix well.

Cover and chill at least 2 hours or overnight.

In a large pot cook carrots for 5 minutes over medium high heat.

Add chicken stock, water, soup base, poultry seasoning, celery salt, salt and pepper. Bring to a boil.

Using an ice cream soup make matzo balls.

Drop into boiling water and turn heat down to a simmer. Cover and cook for 30 minutes.

Meanwhile cook egg noodles according to package directions in a separate pot.

Add the noodles you want to use to your soup bowl. Add soup on top.


Wednesday, June 19, 2013

Two Color Rosemary Roasted Potatoes

Cookbook Recipe #54

Yet another recipe from Southern Living. Have I told you how much I love these cookbooks? I was not having luck finding a main dish I wanted to make this week for my cookbook recipe so I decided to go for a side dish. I had a bunch of potatoes in the pantry so I started looking for a potato dish. Phil and I both really like oven roasted potatoes so when I came across this recipe for Two-Color Rosemary Roasted Potatoes, I thought it sounded pretty good. They were really good. I just really like how you get almost a little char on them. Gives them so much flavor. We both enjoyed the combo of the sweet potatoes and baby red potatoes. It was a great side dish to go with our pork chops.

Two Color Rosemary Roasted Potatoes
Adapted From Southern Living Annual Recipes 2005


2 large sweet potatoes, diced
1 pound baby red potatoes, diced
2 tablespoons olive oil
1 tablespoon dried rosemary
Salt
Pepper

Preheat oven to 450 degrees.

Place potatoes on a sheet pan.

Drizzle with olive oil. Season with rosemary, salt and pepper.

Bake for 35-45 minutes.


Wednesday, June 12, 2013

Polpettine di Tacchino (Turkey Meatballs)

Cookbook Recipe # 53

I kind of combined a couple recipes in this book for the meatballs. I took ingredients from both recipes to make one recipe. As I liked certain pieces of each one. I have made even a different turkey meatball recipe from Mario Batali that was very similar to this recipe and I loved how they came out. It is going to be my go to meatball recipe from now on for sure because they are the moistest meatballs I have ever had. Sometimes meatballs can come out so dense. Not these, they are very light and tender. It is the combination of panko breadcrumbs and milk with the meat that makes them that way. One of the recipes calls to use italian sausage in the meatballs as well as the turkey. I did this last time and they were really good, but I decided to just stick to the turkey this time.

I would recommend giving these a try for sure. You can always change up the meat mixture to your liking.

Turkey Meatballs
Adapted from Molto Italiano by Mario Batali


1 pound ground turkey
1 1/2 cups panko bread crumbs
1 cup milk
2 eggs, lightly beaten
1 tablespoon dried parsley
1/2 cup grated parmesan cheese
Salt
Pepper
Olive oil
Pasta sauce (for serving)
Pasta (for serving)


 In a large bowl combine all ingredients. Mix well. Mixture will be wet.

Heat a large skillet over medium heat with olive oil.

Form meatballs into 1 inch balls.

Brown in the skillet on all sides over medium heat for about 10 minutes. Add into your favorite tomato sauce to continue cooking for about another 10 minutes.

Serve with spaghetti.


Saturday, June 8, 2013

Roasted Tomato Soup

Cookbook Recipe #52


I have made this soup several times. It is soooo good. I got the recipe from Katie Lee's Joel's, well was Joel at the time, cookbook. It is a really nice cookbook, I would recommend it for sure. Lot's of different and rustic recipes. I really like rustic recipes, they are just so comforting. This soup is one of them. The only problem with this soup is that it does not yield very much. It is a lot of work for not a lot of product. If I am feeling ambitious I will double or triple the recipe so that I get more, but that requires a mound of tomatoes. Which means lots of seeding and peeling. For some reason the last couple times I have made this the tomatoes have burnt a little. I ended up turning down the temperature and then they were fine. Not really sure what I did different though. Maybe too much olive oil, who knows, it still came out delicious. When I was eating it I was thinking of an addition for next time. Maybe some sherry would give it a richer flavor, not that it needs it.

Roasted Tomato Soup
Adapted from The Comfort Table, by Katie Lee Joel

2 1/2 pounds roma tomatoes, halved, seeded and cored
1 tablespoon minced garlic
2 tablespoons olive oil
3 cups chicken broth
Salt
Pepper
1 teaspoon dried basil
1/2 cup heavy whipping cream

Preheat oven to 300 degrees.

Line a couple baking sheets with foil.

Place tomatoes on baking sheet and drizzle with olive oil and season with salt and pepper. Roast for 2 hours.

If tomatoes start browning too much turn temperature down to 250 degrees.

Let tomatoes cool to the touch. Remove and discard skins. Tear the tomatoes into bite size pieces and put into a medium saucepan. Add garlic and chicken broth.

Bring to a boil. Reduce heat and simmer for 40 minutes uncovered.

Season with more salt and pepper if needed. Use an immersion blender and blend tomatoes until desired consistency.

Stir in heavy cream. Simmer for 10 more minutes.


Tuesday, June 4, 2013

Buffalo Chicken Dip

 Phil's Aunt and Uncle had a party to watch the Chicago Blackhawk's in the playoffs. I brought buffalo chicken dip to the party. Everyone always loves this when I make it. I can't believe actually that I have not posted this one yet as I make it all the time for parties. After the dip is cooked I mix it all together. People say that it tastes much better when it is mixed versus in the layers. I think this dip is my all time favorite party dip. I definitely suggest making a double or triple batch of this for a party as it always goes fast! The recipe below is for a double batch.

Buffalo Chicken Dip
Adapted from Frank's Red Hot

2 cups shredded rotisserie chicken
1 cup ranch dressing
1 cup Frank's Red Hot
2 (8oz) boxes cream cheese, softened
2 cups shredded cheddar cheese, divided

Preheat oven to 350 degrees.

Spread softened cream cheese on the bottom of a 9 x 13 baking dish.

Mix together in a bowl chicken, ranch and Frank's Red Hot. Pour over cream cheese.

Top with 1 1/2 cups shredded cheese.

Bake for 20 minutes or until bubble.

Mix together after it is baked.

Top with remaining shredded cheese.


Monday, May 27, 2013

Slow Cooker Pulled Pork

Cookbook Recipe #51

Happy Memorial Day and thank you to all those who have served our country!

It was not a nice day here in Illinois, on a holiday that most people like to spend outside by the grill. I decided to spend mine by my slow cooker. When I think of Memorial Day food I think of burgers, dogs, and pulled pork sandwiches. I went for the pulled pork sandwiches. I was telling Phil that I do not know if I have ever had a pulled pork sandwich. Most people I know put onions in their pulled pork, so I usually stay away from it, just in case. And I have never made it personally, so I think this was my first time having one. A little crazy I know. It was very good, and topped with some coleslaw. I very much enjoyed it. I used a vinegar based coleslaw as I am not a fan of the mayonnaise coleslaw. I also changed up the recipe a little bit from the original in that I did not put the barbeque sauce in right away because I think that the meat soaks up the sauce to much in a slow cooker so I waited till the last hour to put it in. Instead of sauce going in right away I used root beer for the liquid which I think gave it more of a sweet taste. For, I think, my first pulled pork sandwich, I would say it was a winner.

Slow Cooker Pulled Pork
Adapted from Crock Pot Slow Cooker Best Loved Recipes

1 boneless pork shoulder
1 teaspoon salt
1 teaspoon ground cumin
1 teaspoon onion powder
1 teaspoon paprika
1 teaspoon black pepper
1/2 teaspoon ground red pepper
1 can root beer
1 18oz bottle barbeque sauce
Sandwich Buns
Your favorite coleslaw

Mix salt, cumin, paprika, onion powder, black pepper and red pepper. Rub on pork roast.

Place in slow cooker. Cover with root beer.

Cook on low for 8 - 10 hours.

With one hour remaining  remove roast from slow cooker. Remove and discard any fat from the roast.

Place back in slow cooker and cover in barbeque sauce. Cook one more hour.

Serve on a bun with your favorite coleslaw.

 This recipe is linked on:     Show me What You Got Tuesdays Mix it Up MondaysMelt in your Mouth Mondays,  On the Menu Monday,   

Saturday, May 25, 2013

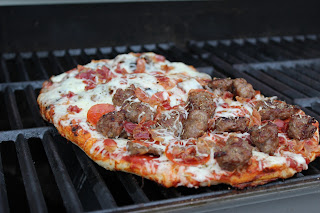
Grilled Pizza

Phil and I have always talked about grilling a pizza but have never got around to it, until now. It was super easy to do and really good. The crust gets super crispy on the grill, which is just the way I like it. You just really have to watch it so it doesn't burn. So many different kinds would be really good like this. We did a traditional kind for the first round. Next time I might want to try spinach, mushroom and feta. Or even a buffalo chicken would be really good. The possibilities are endless! I have a feeling we will be trying this again very soon.

Grilled Pizza

Frozen pizza crust ball, thawed
2 cups shredded mozzarella cheese
Corn meal
Olive Oil
Pizza Sauce
Italian Seasoning
Assorted toppings (we used Italian Sausage, Pepperoni, Mushroom, and Bacon

Preheat grill to medium high heat.

Roll out pizza dough to desired thickness. Brush will olive oil and top with some corn meal.

Place dough on grill plain side down.

Grill over direct heat until crust turns brown and starts to bubble, about 6 minutes.

Place pizza sauce on plain side of pizza. Top with cheese, Italian seasoning, and assorted toppings.

Place back on grill until cheese is bubbly about 3-5 more minutes.


This recipe is linked on:  Foodie FridaySaturday Show and TellShow and Tell Saturday,  Super Saturday Show and Tell,   Foodie riday Weekend Potluck Think Pink Sunday,  Cream of the Crop


Wednesday, May 22, 2013

Slow Cooker Bratwurst

Cookbook Recipe # 50

We had a potluck at work yesterday and we were supposed to bring a dish that represents the country of our heritage. My family is all from Germany so I thought bratwurst was appropriate. I get into work at 7:00 am and we were not having lunch until 12:00 pm so I needed something that I could keep hot until lunch. So I saw this recipe for bratwurst in the slow cooker. The original recipe called for beer but I did not think that was work appropriate so I decided to use apple juice instead. This was my first time cooking bratwurst in a slow cooker and it came out pretty good. It was really juicy and tender. It is a good way to make when you want to keep it hot and you have a lot of people eating it. German food just does not look appetizing no matter what you do. The recipe below is for one batch.

Slow Cooker Bratwurst
Adapted from Fix it and Forget it Cookbook


6 fresh bratwurst
1 tablespoon minced garlic
Apple juice

Add bratwurst and garlic to slow cooker. Cover with apple juice.

Cook on low for 6-7 hours or on high for 3-4 hours.


Sunday, May 19, 2013

Oreo Rice Krispies

Phil and I went to a Pig Roast last night up in Wisconsin. I was trying to figure out something that I could bring that would be okay on the ride up there. I saw these Rice Krispie treats awhile back on Chef in Training I thought they would be the perfect recipe to sustain the ride and they only took 5 minutes to make, even better. They were gone pretty quickly. There were so many people at this party though that I did not get to hear any reviews. Phil and I each had one though and we both thought they were really good. I like trying different renditions of these. My mom used to make them with fruity pebbles. Those were always my favorite. These were a great change as well. A great treat for a party.

Oreo Rice Krispie Treats
Adapted from Chef in Training

6 cups Rice Krispie Cereal
20 regular Oreos, chopped
5 cups mini marshmallows
3 tablespoons butter

Spray a 9 x 13 baking dish with cooking spray.

In a large bowl mix the Rice Krispies and the Oreos.

In a large microwave safe bowl melt butter in microwave for about 30 seconds. Add marshmallows and microwave for 1 minute and 30 seconds.

Mix marshmallow mixture with Rice Krispies.

Add to 9 x 13 pan and use a spatula to press mixture around the dish.

Let cook to harden.


Monday, May 13, 2013

Pork Chops with Grits and Red Eye Gravy

This recipe was the epitome of the south, or at least what I think of when I think of southern food. This was a good recipe last night when it was less than warn outside here in Illinois in the middle of May. I think this is more of a fall or winter dish, but with a few cold days upon us it was a nice comforting dish. I am not a big coffee fan, so I did not know what I was going to think of the red eye gravy, but it was quite good. Mixed with the mushrooms, it was a nice rich sauce to go with the pork chops and grits. Phil and I both really enjoyed this recipe.

Pork Chops with Red Eye Gravy
Adapted from Cooking Light

1 tablespoon olive oil
4 center cut bone in pork chops
Salt
Pepper
1 teaspoon dried thyme
4 ounces mushrooms sliced
1/4 cup sherry
1/2 cup coffee
1/2 cup V8 juice
2 teaspoons mirin
1/8 teaspoon ground red pepper
2 teaspoons cornstarch
2 1/4 cups fat free milk, plus 2 tablespoons, divided
1/2 cup quick cooking grits
1 tablespoon butter

Heat a large skillet over medium high heat. 

Season pork with salt and pepper.

Add oil to pan and cook pork chops 3-6 minutes per side, depending on thickness. Remove from pan and set aside. Keep warm.

Add mushrooms and thyme to pan. Cook for about 4 minutes. 

Add wine and scrape any brown bits from bottom of pan. Add pepper,1/4 cup coffee, V8, mirin, and red pepper. 
Bring to a simmer and cook 3 minutes. 

Combine cornstarch and remaining coffee in a small bowl. Add to pan and cook for another 2 minutes. 

Meanwhile bring 2 1/4 cups milk and salt to a boil in a medium saucepan. Gradually stir in grits, reduce heat and simmer for 5 minutes or until liquid is absorbed. 

Remove from heat and stir in remaining 2 tablespoons milk and butter. 

Serve pork chops with gravy over grits. 


Sunday, May 12, 2013

Creme Brulee French Toast

Cookbook Recipe #49


Happy Mother's Day!

My mom got gave me this cookbook a while back. It is a collection of recipes from Iowa Bed and Breakfast's. My mom's best friend and my other mom growing up Kristy has a bed and breakfast in the town I grew up. She makes delicious breakfast food to. This cookbook came out before she had the bed and breakfast though, so her recipe's are not in it. There are a lot of great recipes in this book including the recipe I chose to make from it. Or should I say Phil's mom chose. I had Phil's parents over for brunch today and I could not decide what to make so I gave his mom Linda a few choices and this is the recipe she chose. Everyone loved it. I don't really know what is creme brulee about it but it was good nonetheless. I love breakfast casseroles that you can make the night before and then just pop them in the oven in the morning. Such a time saver when you have guests coming over.

Creme Brulee French Toast
Adapted from Discover Iowa

1 stick butter
1 cup brown sugar
2 tablespoons corn syrup
1 loaf cinnamon raisin bread
5 large eggs
1 1/2 cups half and half
1 teaspoon pure vanilla
3 teaspoons triple sec
1/4 teaspoon salt


In a small saucepan, melt butter with brown sugar and syrup over medium heat. Cook until smooth and then poor into a 9 x 13 inch baking pan.

Cut bread into 1 inch slices and arrange in pan.

In a large bowl whisk eggs, half and half, vanilla, triple sec and salt. Pour over bread in pan.

Cover and refrigerate overnight.

Take french toast out of refrigerate to bring to room temperature.

Preheat oven to 350 degrees.

Bake for 45 minutes.

Let stand for at least 5 minutes before serving.

This recipe is linked on:  Foodie FridayShow and Tell SaturdayStrut Your Stuff Saturday,  Kitchen Fun with my 3 Sons,  Rediscovering Lost Arts From Our Mothers Mix it Up MondaysMelt in your Mouth Mondays,  On the Menu Monday,  Show me Your Plaid MondaysMop It Up Monday


Saturday, May 11, 2013

Breakfast Sandwiches with Mango Chutney

This was my first encounter with  mango chutney. I was a little unsure about it but it was actually quite tasty. It was a nice compliment to the breakfast sandwiches. I told Phil I was putting mango chutney on the breakfast sandwiches and he thought it sounded strange also, but he really liked it too. This recipe is a much healthier version then its McDonald's cousin. I used whole grain English Muffins, fat free cheese slices, and Canadian bacon. One thing I did that wasn't the best was that I decided to throw on a sausage patty. It just sounded good. The sandwiches were really good and quite filling. Served along side some fresh fruit, it was a nice balanced breakfast.

Breakfast Sandwiches with Mango Chutney
Adapted from Cooking Light

8 slices Canadian bacon
4 pre-made sausage patties
4 large eggs
2 tablespoons water
Salt
Pepper
4 slices fat free cheese slices
8 teaspoons mango chutney
4 whole grain English Muffins

In a large skillet cook sausage patties according to package directions. Last few minutes add canadian bacon slices to heat about a minute a side.

Preheat broiler to high heat.

With 5 minutes left, start eggs.

In a bowl whisk eggs, water, salt and pepper. Add to saucepan and cook over medium low heat for about 3 minutes. Whisking to scramble. Set aside.

Split English muffins and place on a baking sheet. Top one side with a slice of cheese. Spread chutney on the other side.

Layer with eggs, Canadian bacon and sausage.

Broil for 2 minutes.

Place top halves of muffins over the bottom halves.

This recipe is linked on:  Foodie FridayShow and Tell Saturday, Rediscovering Lost Arts From Our Mothers Think Pink Sunday,  Cream of the Crop, Mix it Up MondaysMelt in your Mouth Mondays,  On the Menu Monday,  Show me Your Plaid MondaysMop It Up Monday


Thursday, May 9, 2013

Smokey Garlic and Spice Chicken

My friend Nicole made this recipe a couple weeks ago and told me how good it was. One of Phil and I's favorite dinners is roast chicken and we are always open to new recipes for it. This one was really good. The combination of spices made a delicous marinade. It gave the chicken a beautiful color as well. Phil used our can rack to roast the chicken and used root beer as the can. I really think that cooking the chicken over the can helps make the chicken really moist.


Smokey Garlic and Spice Chicken
Adapted from Taste of Home

1/2 cup reduced sodium soy sauce
3 tablespoons lime juice
3 teaspooons minced garlic
1 tablespoon olive oil
1 tablespoon ground cumin
1 teaspoon paprika
1/2 teaspoon dried oregano
1/2 teaspoon pepper
1 whole chicken
1 can root beer

In a large zip lock bag mix first 8 ingredients. Add the chicken and turn to coat. Refridgerate 8 hours or overnight.

Preheat oven to 400 degrees.

Drain and discard marinade.

Place root beer in can rack and place the chicken over the can rack.

Roast in oven for 30 minutes at 400 degrees. Reduce temperature to 350 degrees. Cover chicken with foil to keep from getting too brown. Cook an additional 90 minutes.

 This reicpe is linked on:Full Plate Thursday, Link it Up Thursday, Thriving on Thursdays, Tasty Thursdays

Tuesday, May 7, 2013

Sweet and Sour Chicken

Cookbook Recipe #48

My Mom gave me this cookbook a couple of years ago. I thought it was so cool because Walt Disney World brings back so many great family memories. All the recipes in the book are from the different resorts at Disney and restaurants that are in the World Showcase at Epcot. I chose this recipe of Sweet and Sour chicken because it is from the Polynesian Village Resort. My family and I always stayed there when we went to Disney. It is probably my favorite hotel I have ever stayed in. It is on the lagoon that the monorail runs around. It is right directly across from Magic Kingdom and we always sat on the beach and watched the fireworks every night that were shot off there. When Phil and I went to Florida a couple years back I took him there and he loved it as well. I also just recently saw a recipe for Sweet and Sour Chicken on a friends blog Macke Monologues. You should check out her blog! Her recipe looked really good, so when I saw this recipe the other day I knew it was going to be the one for this week. I added a few extra vegetables to the recipe but other than that I kept it the same. It was really good. It tasted very similar to Sweet and Sour Chicken from a Chinese restaurant. Phil and I both really enjoyed it and will be making it again for sure!

Sweet and Sour Chicken from the Coral Isle Cafe at the Polynesian Village Resort
Adapted from Cooking with Mickey

Chicken

1 1/2 pounds boneless skinless chicken, cut into 1 inch squares
4 tablespoons vegetable oil
2 teaspoons chicken bouillon
1/8 teaspoon yellow food coloring
2 cups water
1/4 teaspoon white pepper
1/4 teaspoon garlic powder
Salt
Sesame seeds for serving

Sweet and Sour Sauce

1 green bell pepper
1 1/2 cups snow peas
8 oz sliced mushrooms
3 carrots, peeled and diced
3/4 cup cider vinegar
3/4 cup sugar
1 1/2 cups water
1 1/2 cups diced pineapple
4 1/2 teaspoons cornstarch
4/1/2 teaspoons water
Few drops red food coloring

Combine all ingredients for the chicken except for the sesame seeds in a medium skillet.

Cook, covered over low heat for 25 minutes.

Meanwhile combine vegetables, except for snow peas, vinegar, sugar and water in a large saucepan. Bring to a boil and simmer for 20 minutes.

Add snow peas in with 5 minutes left.

Add pineapple and return to a boil.

Stir cornstarch into water and dissolve. Add to vegetables. Cook and stir until thickened and clear. If desired add food coloring.

Drain chicken liquid and add chicken to vegetables and sauce.

Top with sesame seeds to garnish.

Print Recipe

This recipe is linked on:   Cast Party WednesdayTempt My Tummy TuesdayTasty Tuesday PartyTalent Show Tuesdays,  Linking up With Luna, Show me What You Got TuesdaysShare it Link Party    Tasty Tuesday


Sunday, May 5, 2013

Cinco de Mayo

Happy Cinco de Mayo! So this is going to be a long post...... We made so many new things today and I couldn't decide what I wanted to post. So I am going to post all of the recipes. I new I wanted to make something fun and different for today. I saw a recipe for Grilled Baja Style Lobster Tails on Cooking Light's website and thought it sounded really good. I just realized I liked lobster a couple months ago when Phil and I went to the Melting Pot for dinner. I got an entree that had an assortment of meats and lobster. Phil got the same thing I did so I figured I would trade the lobster for more steak. But I tried it and I loved it! Phil was saying that we should try to grill it at home sometime. I saw this recipe and thought we could give it a try. It came out awesome!. The only lobster tails we could find were pretty small so next time we will have to do our research to find a larger tail. But we had so much other food it did not matter. I have been seeing Mexican Street Corn on the Cacique commercials that have been playing over and over recently. So I found a recipe to make the street corn as well. Corn is not really in season yet so I cannot wait to try this one again when the corn is really good. And you can't have a Mexican fiesta without salsa and Margaritas! We made those homemade too! Hope you enjoy the recipes!

Mango Margaritas
Recipe adapted from Ree Drummond

1 tablespoon sugar
1 20 ounce jar mango chunks, drained
1/2 cup tequila
1/2 cup triple sec
Tall cup of ice

Mix all ingredients into a blender and mix well.

Print Recipe


Roasted Tomato Salsa
Recipe adapted from Martha Stewart

9 plum tomatoes, cut in half lengthwise
1 large white onion, quartered
2 jalapenos
2 tablespoons minced garlic
1 tablespoon lime juice
Salt


Preheat grill to medium high heat.


Place onions, tomatoes and jalapeno on grill and grill over direct heat for 8-10 minutes and then flip over and grill another 8-10 minutes or until charred.

Let cool completely.

Blend vegetables, garlic, lime juice and salt in a blender.

Refrigerate until ready to serve (salsa gets better the longer it sits in the fridge).

Print Recipe

Grilled Baja Style Lobster Tails
Adapted from Cooking Light and Bobby Flay


Up to 6 lobster tails
1 tablespoon grated orange rind
2 tablespoons fresh orange juice
1 tablespoon fresh lime juice
1 tablespoon olive oil
1/2 teaspoon dried oregano
1/4 teaspoon salt
Dash of hot sauce
1 teaspoon minced garlic
2 tablespoons butter, melted
Salt
Pepper

Preheat grill to high heat for direct grilling.

Bring a large pot of salted water to a boil. Add lobster tails and boil 6 minutes. Drain well.

Meanwhile prepare butter sauce. Combine rind and next 7 seven ingredients in a medium bowl. Mix well. Gradually add butter and stir constantly.

Split each lobster tail lengthwise down the underside, making sure not to cut through the back shell.

Brush the flesh side of each lobster tail with oil, some of the butter sauce, salt and pepper.

Grill flesh side down for 3 minutes. Flip over and grill another 3 minutes.

Serve immediately.

Print Recipe

Mexican Street Corn
Adapted from Jam Hands 


4 large ears of corn, dehusked and desilked
Butter
Salt
Pepper
1/2 cup mexican crema
1 1/2 cups queso fresco, crumbled
4 teaspoons ancho chile powder


Preheat oven to 400 degrees.

Brush corn with butter and season with salt and pepper.

Roast in oven for 20-25 minutes.

Brush with mexican crema.

Roll in queso fresco.

Season with ancho chili powder.

Print Recipe

This recipe is linked on: Foodie FridayShow and Tell SaturdayStrut Your Stuff Saturday,  Kitchen Fun with my 3 Sons,  Rediscovering Lost Arts From Our Mothers Mix it Up MondaysMelt in your Mouth Mondays,  On the Menu Monday,  Show me Your Plaid Mondays, Mop It Up MondayMeal Time Monday